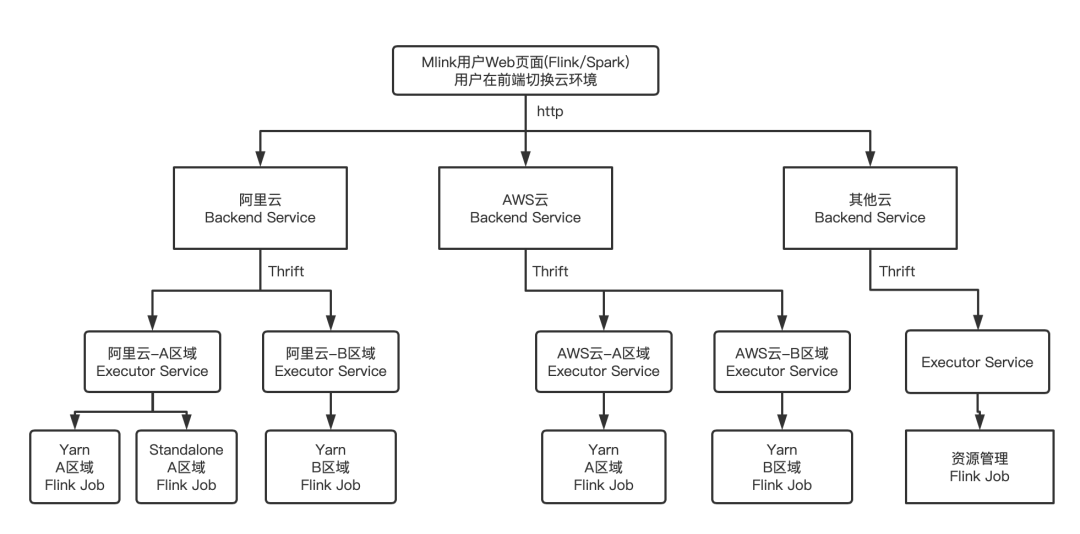

文章目录
本文将介绍如何在Google Compute Engine(https://cloud.google.com/compute/)平台上基于 Hadoop 1 或者 Hadoop 2 自动部署 Flink 。借助 Google 的 bdutil(https://cloud.google.com/hadoop/bdutil) 工具可以启动一个集群并基于 Hadoop 部署 Flink 。根据下列步骤开始我们的Flink部署吧。
要求(Prerequisites)
安装(Google Cloud SDK)
请根据该指南了解如何安装 Google Cloud SDK。需要注意的是,请确保使用下面的命令和Google Cloud进行相关的授权验证:
gcloud auth login
安装 bdutil
当前 bdutil 发布版本中并不包含 Flink 扩展。不过,你可以从 GitHub 获得最新版本 bdutil ,master分支已经支持 Flink :
git clone https://github.com/GoogleCloudPlatform/bdutil.git
在源码下载完成之后,进入新创建的 bdutil 目录,继续下一个步骤。
在Google Compute Engine上部署Flink
设置一个 bucket
如果没有的话,需要创建一个 bucket 用于配置 bdutil 和 staging 文件。gsutil 可以创建一个新的 bucket :
gsutil mb gs://<bucket_name>
适配 bdutil 配置
使用 bdutil 部署 Flink ,在 bdutil_env.sh 中至少需要配置下列参数。
CONFIGBUCKET="<bucket_name>"
PROJECT="<compute_engine_project_name>"
NUM_WORKERS=<number_of_workers>

# set this to 'n1-standard-2' if you're using the free trial
GCE_MACHINE_TYPE="<gce_machine_type>"

# for example: "europe-west1-d"
GCE_ZONE="<gce_zone>"
适配 Flink 配置
bdutil 的 Flink 扩展已经为你处理好配置了。你可以在 extensions/flink/flink_env.sh 中添加配置参数。如果想进一步了解配置参数,请见 Flink 配置 。在修改配置之后需要使用bin/stop-cluster 和 bin/start-cluster重启Flink。
启动一个 Flink 集群
在 Google Compute Engine 上启动一个 Flink 集群,执行命令:
./bdutil -e extensions/flink/flink_env.sh deploy
运行 Flink 示例程序
./bdutil shell
cd /home/hadoop/flink-install/bin
./flink run ../examples/batch/WordCount.jar     \
gs://dataflow-samples/shakespeare/othello.txt gs://<bucket_name>/output
关闭集群
关闭一个 Flink 集群只需执行
./bdutil -e extensions/flink/flink_env.sh delete
本文翻译自:https://ci.apache.org/projects/flink/flink-docs-master/setup/gce_setup.html
本博客文章除特别声明,全部都是原创!原创文章版权归过往记忆大数据(过往记忆)所有,未经许可不得转载。
本文链接: 【Flink部署在Google计算引擎平台上】(https://www.iteblog.com/archives/1650.html)