
文章目录
为了方便集群的部署,一般我们都会构建出一个 dokcer 镜像,然后部署到 k8s 里面。Presto、Prestissimo 以及 Velox 也不例外,本文将介绍如果构建 presto 以及 Prestissimo 的镜像。
构建 Presto 镜像
Presto 官方代码里面其实已经包含了构建 Presto 镜像的相关文件,具体参见 $PRESTO_HOME/docker 目录:
➜  target git:(velox_docker) ✗ ll ~/data/code/apache/presto/docker
-rw-r--r-- 1 iteblog iteblog 2.0K Jun 19 11:06 Dockerfile
-rwxr-xr-x 1 iteblog iteblog 1011 Jun 21 15:17 entrypoint.sh
drwxr-xr-x 2 iteblog iteblog 4.0K Mar 29 17:35 etc
在构建镜像之前,我们需要在 etc 目录下准备好对应的 config.properties、jvm.config 以及 node.properties 的配置,同时根据需要在 etc/catalog 目录下准备好相关的 catalog 配置。比如我的 config.properties 文件配置如下:
presto.version=0.282
http-server.http.port=8080
discovery-server.enabled=true
discovery.uri=http://localhost:8080
node-scheduler.include-coordinator=false

optimizer.optimize-hash-generation=false
parse-decimal-literals-as-double=true
experimental.internal-communication.thrift-transport-enabled=true
offset-clause-enabled=true
regex-library=RE2J
inline-sql-functions=false
use-alternative-function-signatures=true
同时,我准备了 tpch 和 hive 数据源,配置分别如下:
connector.name=tpch
tpch.column-naming=STANDARD
注意,因为 Velox 和 Presto 中的 tpch 列名不太一样,所以我们必须在 Presto 的 etc/catalog/tpch.properties 文件里面加上 tpch.column-naming=STANDARD,否则查询的时候会出现列找不到的问题。
connector.name=hive-hadoop2
hive.metastore.uri=thrift://localhost:9083
hive.parquet.pushdown-filter-enabled=true
根据需要,可以修改一下 entrypoint.sh 文件,这个文件是镜像启动的切入点。比如我的配置如下:
#!/bin/sh

set -eExv -o functrace
[ -z "$NODE_UUID" ] && NODE_UUID=$(uuid) || return -2
HOSTNAME=`echo $(hostname -I) | awk '$1=$1'`
echo "node.id=${NODE_UUID}"    >> $PRESTO_HOME/etc/node.properties
echo "node.internal-address=${HOSTNAME}"  >> $PRESTO_HOME/etc/node.properties

sed -i "s#discovery.uri=http://localhost:8080#discovery.uri=http://${HOSTNAME}:8080#g" $PRESTO_HOME/etc/config.properties

USE_ENV_PARAMS=${USE_ENV_PARAMS:-0}
HIVE_THRIFT_SERVER="${HIVE_THRIFT_SERVER:-"thrift://localhost:9083"}"

while getopts ':-:' optchar; do
  case "$optchar" in
    -)
      case "$OPTARG" in
        hive.metastore.uri=*) HIVE_THRIFT_SERVER="${OPTARG#*=}" ;;
        use-env-params) USE_ENV_PARAMS=1 ;;
        *)
          other_args+=("--"$OPTARG)
          ;;
      esac
      ;;
    *)
      other_args+=($optchar)
      ;;
  esac
done

sed -i "s#hive.metastore.uri=thrift://localhost:9083#hive.metastore.uri=${HIVE_THRIFT_SERVER}#g" $PRESTO_HOME/etc/catalog/hive.properties

$PRESTO_HOME/bin/launcher run
准备好配置之后,我们使用 mvnw clean install -DskipTests -T 10 命令编译一下整个 Presto 工程,然后把 presto/presto-server/target/presto-server-0.283-SNAPSHOT.tar.gz 和 presto/presto-cli/target/presto-cli-0.283-SNAPSHOT-executable.jar 文件拷贝到 docker 目录下。然后我们就可以执行下面命令打 Persto 镜像了:
export PRESTO_VERSION=0.283-SNAPSHOT
export IMAGE_NAME="presto"
export IMAGE_TAG=${PRESTO_VERSION}
export IMAGE_REGISTRY='mirrors.iteblog.com/presto/'

docker build \
    --network=host \
    --build-arg http_proxy  \
    --build-arg https_proxy \
    --build-arg no_proxy    \
    --build-arg PRESTO_VERSION \
    --tag "${IMAGE_REGISTRY}${IMAGE_NAME}:${IMAGE_TAG}" .
这样我们就打包好了 Presto 镜像。
构建 Prestissimo\Velox 镜像
Presto 官方也给我们提供了如何构建 Prestissimo 的文档,具体参见这里 ,但是官方提供的方案有以下问题:
- 镜像构建时不支持设置线程数,默认是用了系统所有的核心,在内存不够的情况下,会导致系统构建失败;
- 构建镜像会出现依赖问题,导致镜像构建失败;
- 构建出来的镜像缺少一些配置,导致构建出来的镜像无法运行;
- 一些核心配置无法修改,导致运行的节点无法加入到现有集群中。
为了解决上面的问题,我给社区提的 PR:#19874,大家可以根据需要自己合并这个。
然后我们到 presto/presto-native-execution/scripts/release-centos-dockerfile 目录下,新建 catalog 目录,并新增 catalog/tpch.properties 和 catalog/hive.properties 文件,配置分别如下:
connector.name=tpch
connector.name=hive-hadoop2
hive.hdfs.host=www.iteblog.com
hive.hdfs.port=9000
cache.enabled=true
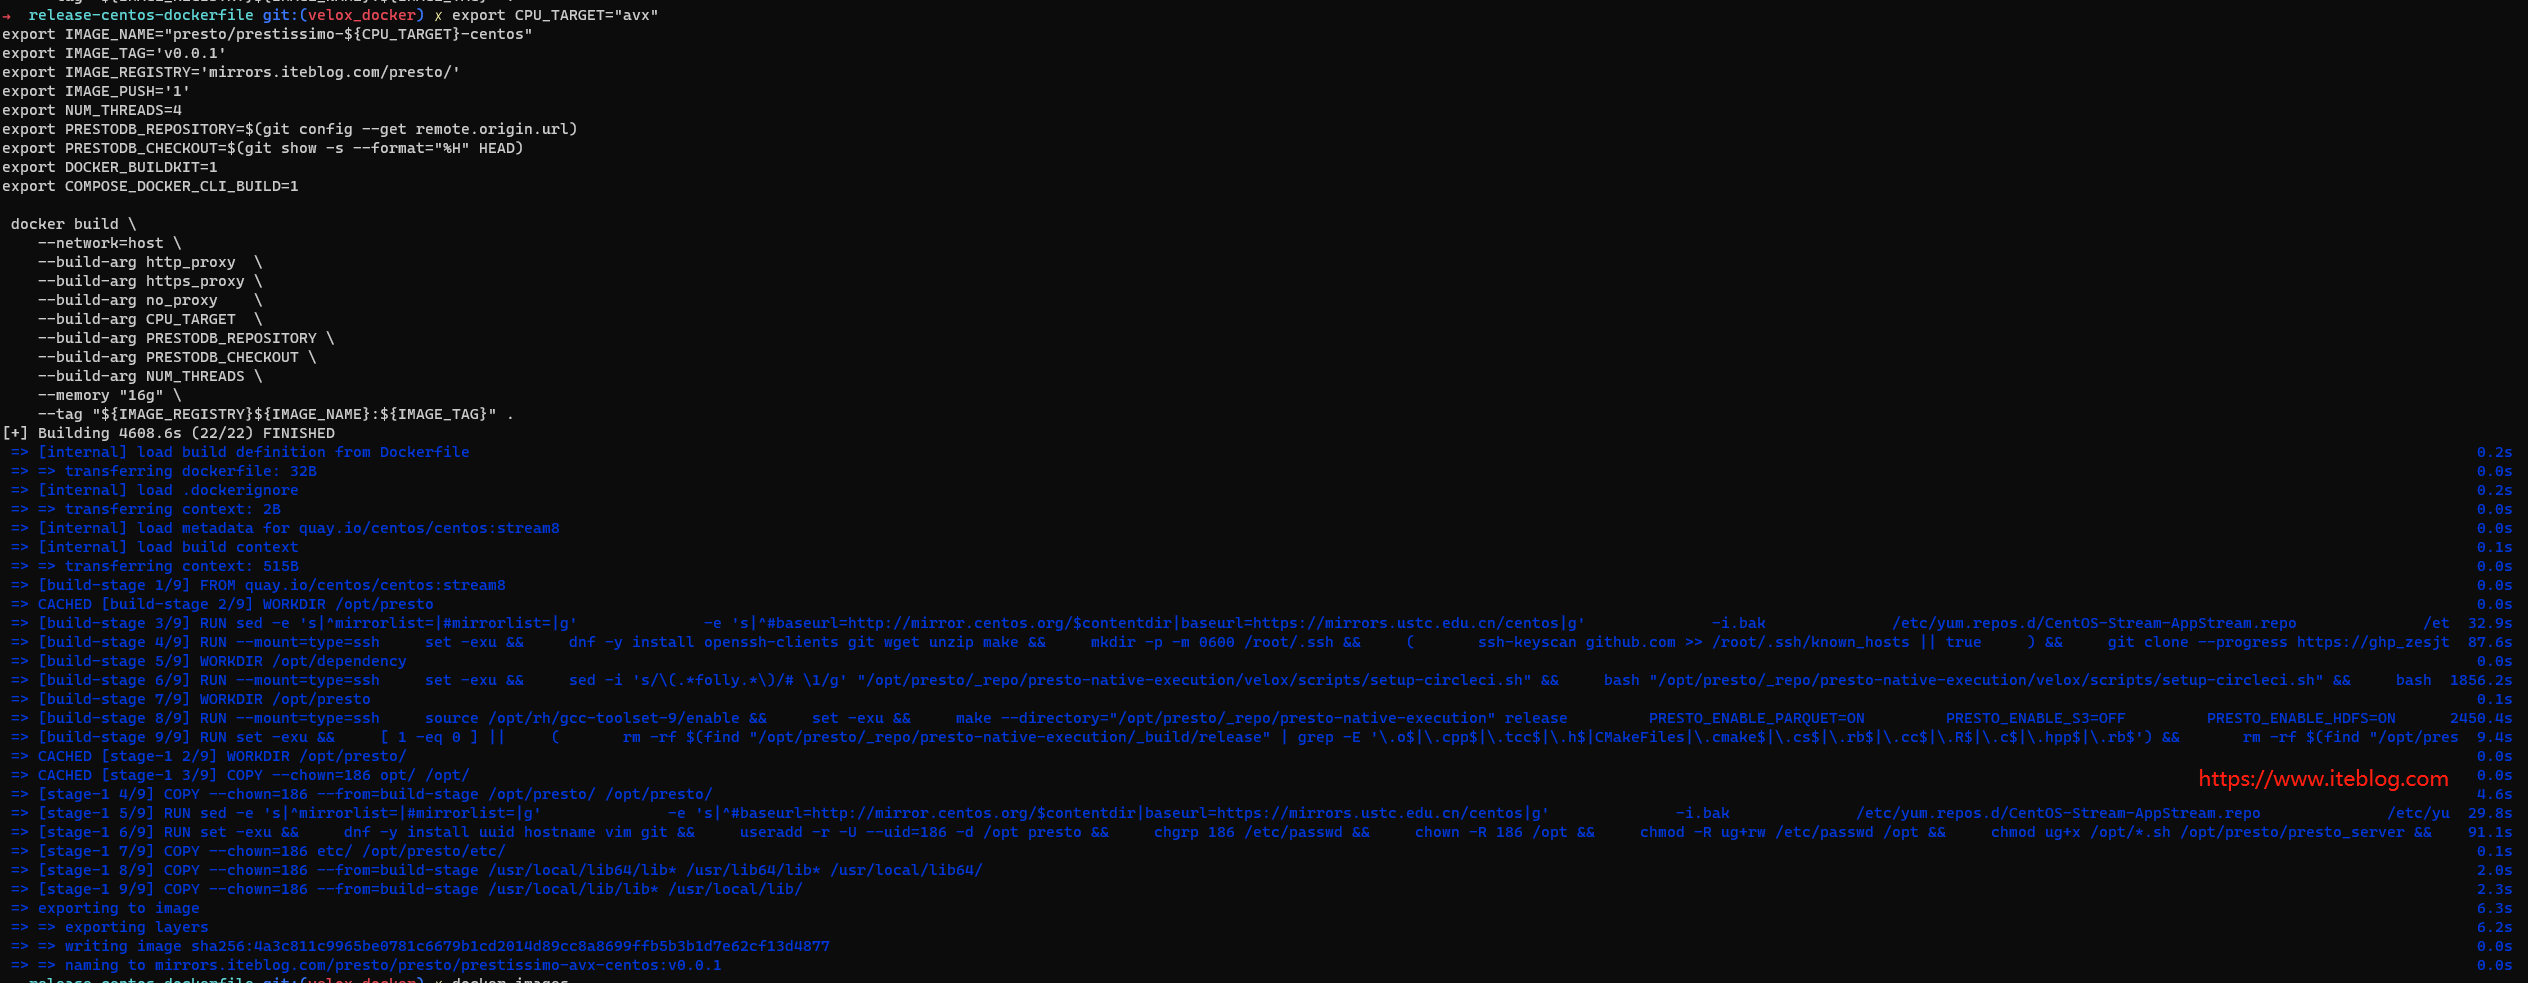
接着我们可以使用下面命令去构建 Prestissimo\Velox 镜像
 export CPU_TARGET="avx"
export IMAGE_NAME="presto/prestissimo-${CPU_TARGET}-centos"
export IMAGE_TAG='v0.0.1'
export IMAGE_REGISTRY='mirrors.iteblog.com/presto/'
export IMAGE_PUSH='1'
export NUM_THREADS=4
export PRESTODB_REPOSITORY=$(git config --get remote.origin.url)
export PRESTODB_CHECKOUT=$(git show -s --format="%H" HEAD)
export DOCKER_BUILDKIT=1
export COMPOSE_DOCKER_CLI_BUILD=1

 docker build \
    --network=host \
    --build-arg http_proxy  \
    --build-arg https_proxy \
    --build-arg no_proxy    \
    --build-arg CPU_TARGET  \
    --build-arg PRESTODB_REPOSITORY \
    --build-arg PRESTODB_CHECKOUT \
    --build-arg NUM_THREADS \
    --memory "16g" \
    --tag "${IMAGE_REGISTRY}${IMAGE_NAME}:${IMAGE_TAG}" .
构建镜像的过程很慢,大家耐心等待。运行完上面命令即可以成功构建好 Prestissimo\Velox 镜像,下面是构建镜像成功的日志:
如果想及时了解Spark、Hadoop或者HBase相关的文章,欢迎关注微信公众号:过往记忆大数据
RUN sed -e 's|^mirrorlist=|#mirrorlist=|g' \
             -e 's|^#baseurl=http://mirror.centos.org/$contentdir|baseurl=https://mirrors.ustc.edu.cn/centos|g' \
             -i.bak \
             /etc/yum.repos.d/CentOS-Stream-AppStream.repo \
             /etc/yum.repos.d/CentOS-Stream-BaseOS.repo \
             /etc/yum.repos.d/CentOS-Stream-Debuginfo.repo \
             /etc/yum.repos.d/CentOS-Stream-Extras.repo \
             /etc/yum.repos.d/CentOS-Stream-HighAvailability.repo \
             /etc/yum.repos.d/CentOS-Stream-Media.repo \
             /etc/yum.repos.d/CentOS-Stream-PowerTools.repo \
             /etc/yum.repos.d/CentOS-Stream-RealTime.repo \
    && dnf clean all \
    && dnf makecache
上面我是采用了中国科学技术大学的 centos 镜像源。
使用镜像的方式构建 Presto + Presto C++ 集群
通过上面的方法,我们就分别构建好 Presto 和 Prestissimo\Velox 镜像了,这时候我们就可以部署 Java 版的 Coordinator 以及 C++ 版本的 Worker 了,具体步骤如下。
启动 Java 版的 Coordinator
可以使用下面命令启动 Java 版的 Coordinator:
docker run -p 8080:8080 "mirrors.iteblog.com/presto/presto:0.283-SNAPSHOT"
如果需要修改 hive metastore 的地址,可以使用下面命令:
docker run -p 8080:8080 "mirrors.iteblog.com/presto/presto:0.283-SNAPSHOT" --hive.metastore.uri=thrift://www.iteblog.com:9083
启动 C++ 版本的 Worker
可以使用下面命令启动 C++ 版本的 Worker
docker run "mirrors.iteblog.com/presto/prestissimo-avx-centos:v0.0.1" \
            --use-env-params \
            --node-environment=test \
            --discovery-uri=http://localhost:8080 \
            --http-server-port=8080
之后,我们就以容器的方式启动了一个 Presto 集群了。我们可以使用下面命令验证一下集群是否运行正常:

如果想及时了解Spark、Hadoop或者HBase相关的文章,欢迎关注微信公众号:过往记忆大数据
从上面可以看出,我们集群是运行正常的。另外,如果你需要访问 hive 数据源,并且文件是在 HDFS 至少,是需要在 worker 的 hive.properties 配置文件加上 hive.hdfs.host 和 hive.hdfs.port 参数。
本博客文章除特别声明,全部都是原创!原创文章版权归过往记忆大数据(过往记忆)所有,未经许可不得转载。
本文链接: 【如何构建 Presto、PrestissimoVelox 镜像】(https://www.iteblog.com/archives/10202.html)