
文章目录
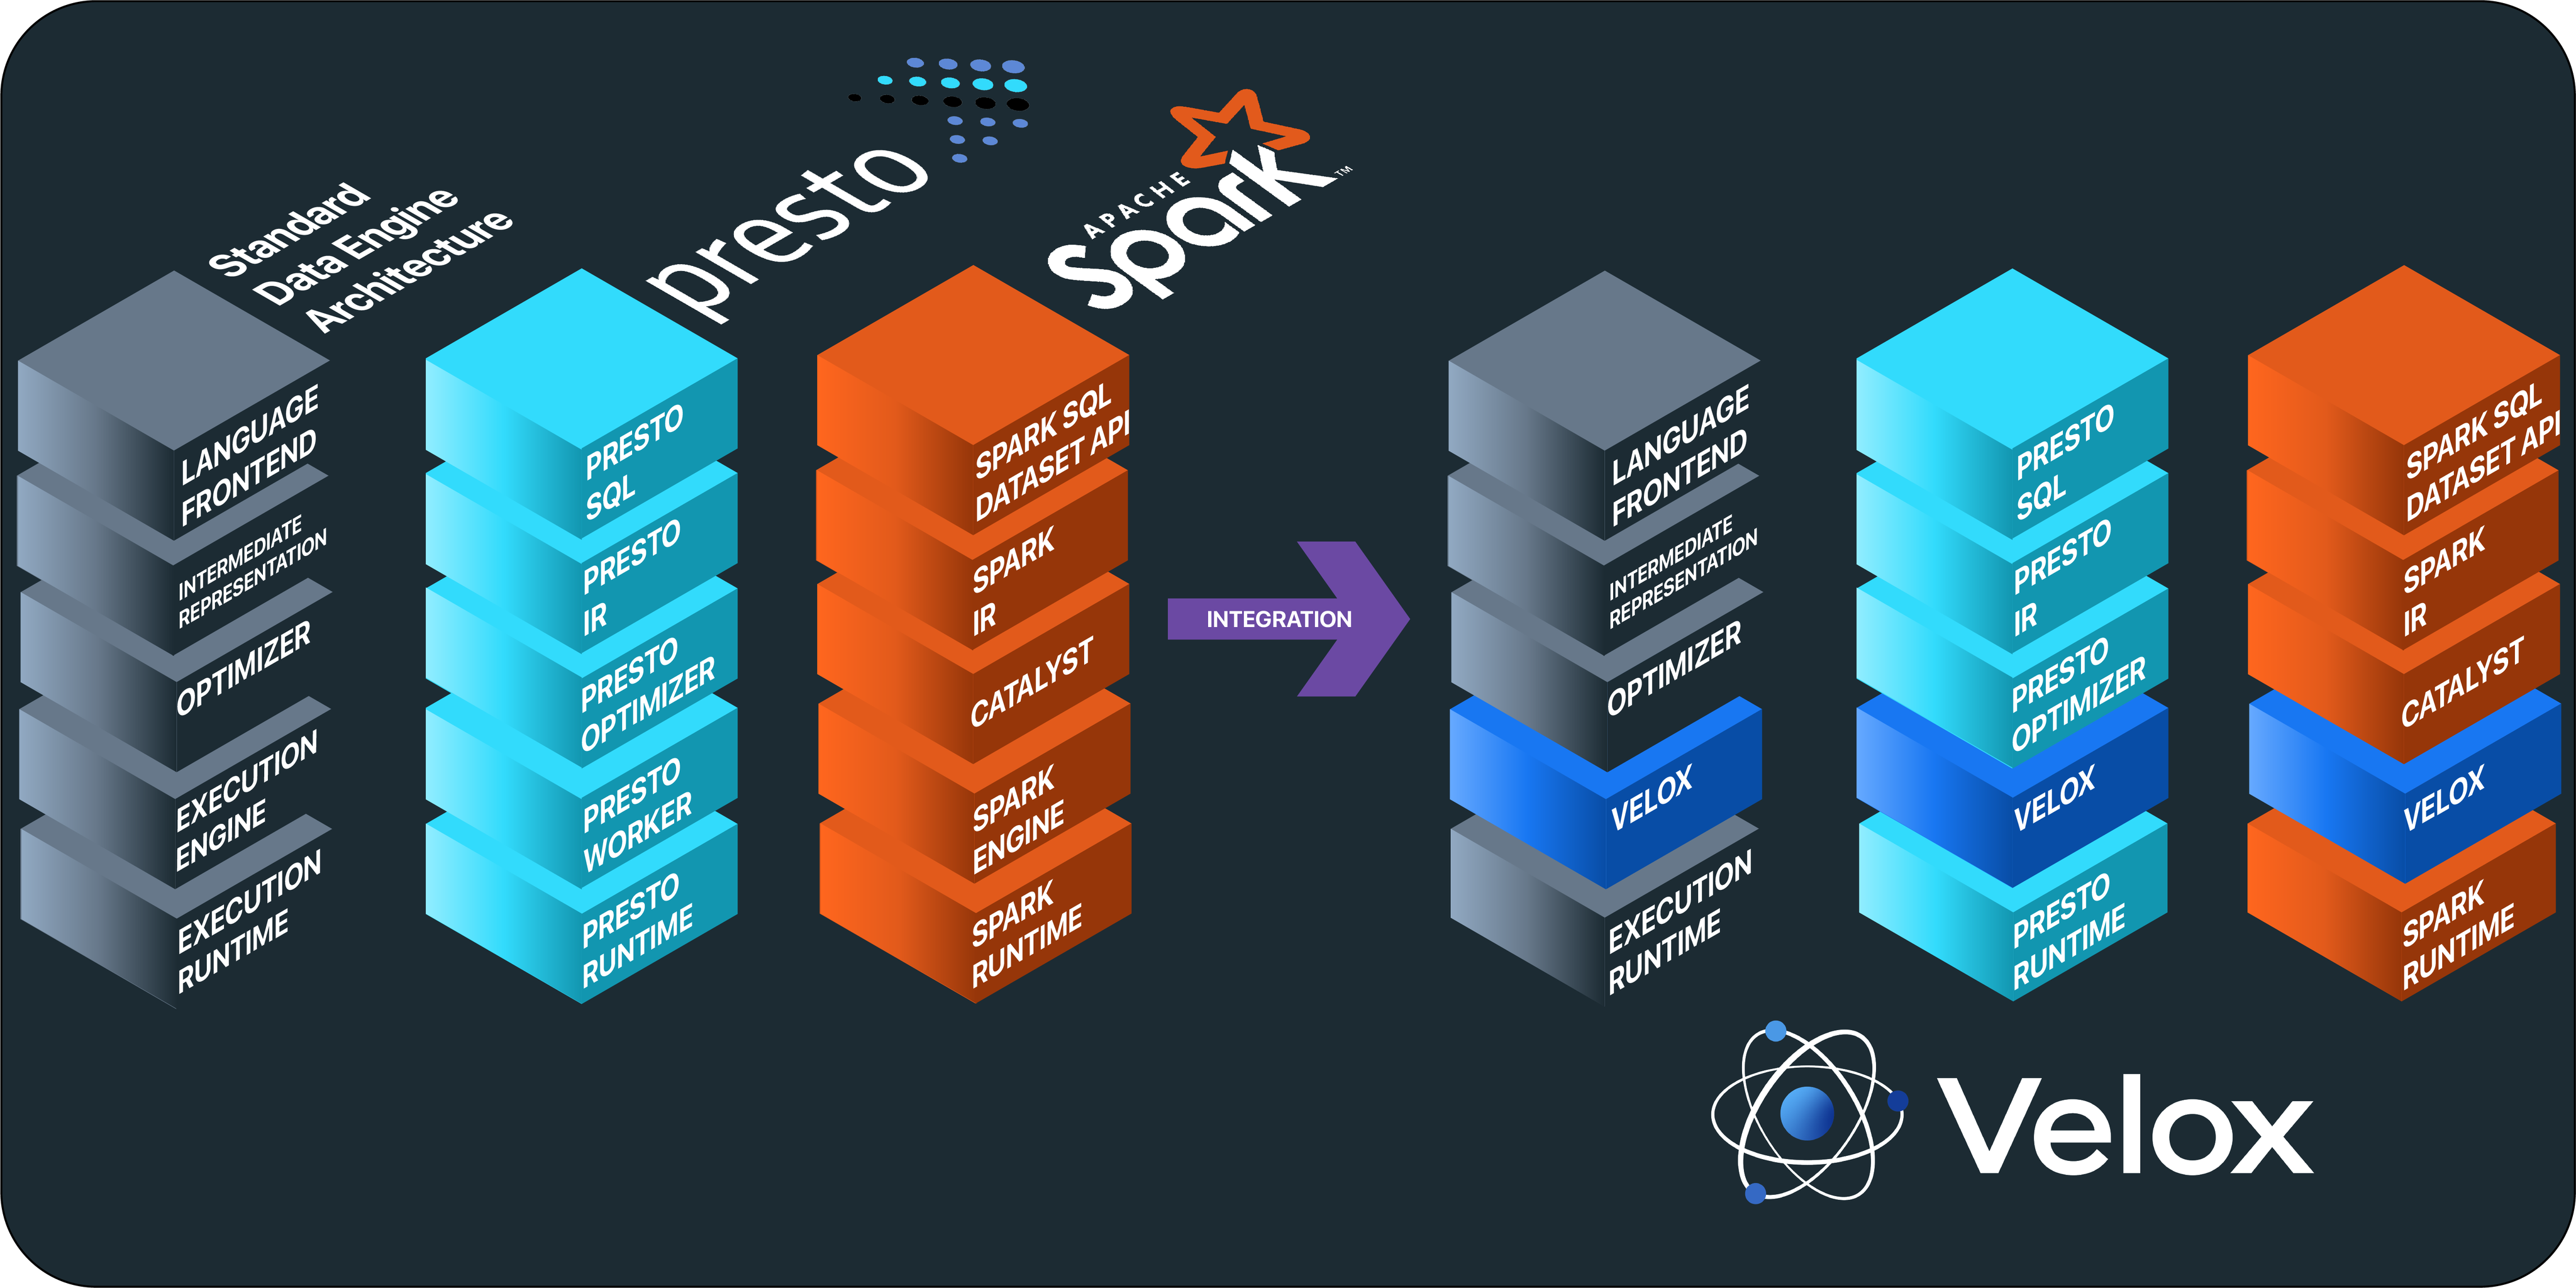
过去十年,存储的速度从 50MB/s(HDD)提升到 16GB/s(NvMe);网络的速度从 1Gbps 提升到 100Gbps;但是 CPU 的主频从 2010 年的 3GHz 到现在基本不变,CPU 主频是目前数据分析的重要瓶颈。为了解决这个问题,越来越多的向量化执行引擎被开发出来。比如数砖的 Photon 、ClickHouse、Apache Doris、Intel 的 Gazelle 以及 Facebook 的 Velox(参见 《Velox 介绍:一个开源的统一执行引擎》)。本文主要关注点是如何在 Presto 上使用 Velox。
Velox 是一个统一的执行引擎,可以和很多的计算引擎进行整合。在 Facebook 内部,Velox 和 Presto(项目名称为 Prestissimo,已开源)、Spark(项目名称为 Spruce,未开源。不过可以使用 Intel 和 Kyligence 开源的 gluten)、流处理系统 XStream、消息系统 Scribe、数据摄取系统 FBETL 以及机器学习系统(数据预处理系统 TorchArrow 和特征工程 F3)等系统都有不同程度的整合。
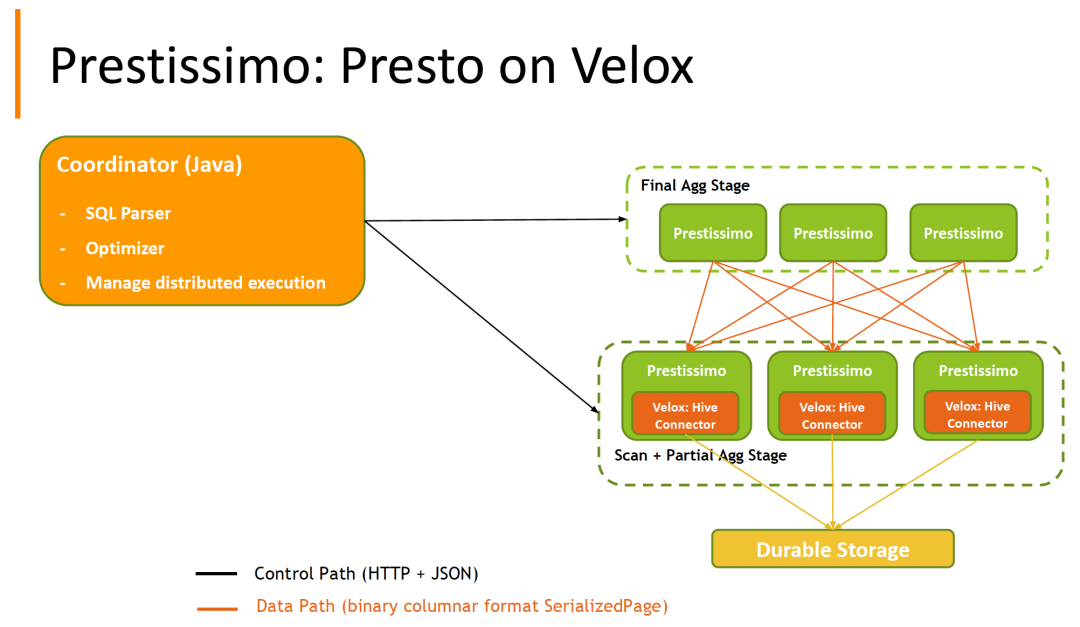
因为 Velox 是使用 C++ 实现的,是一个通用的执行引擎,而 Presto 是使用 Java 实现的,节点之间的通信是有相关接口和协议的,直接调用 Velox 肯定是不行的。为了解决这个文件,Facebook 引入了一个名为 Prestissimo 的项目,它提供了 Presto 的 HTTP REST 接口的 C++ 实现,包括 worker- worker 交换序列化协议(exchange serialization protocol)、coordinator-worker 编排和状态报告 endpoints,从而为 Presto worker 提供了一个临时的 C++ 替代。Prestissimo 主要包括从 Java 实现的 coordinator 接收 Presto plan fragment ,将其转换为 Velox 查询计划,并将其交给 Velox 执行。整个架构大致如下所示:
Prestissimo 项目最初由 Facebook(Meta)于2020年创建,创建的时候是一个单独的项目进行维护的(https://github.com/facebookexternal/presto_cpp),直到今年4月份,Prestissimo 项目的代码已经合并到 Presto 项目里面的 presto-native-execution 模块里面,具体参见这个 MR(Move presto_cpp to presto)。Prestissimo 项目其实有些官方文档介绍如何在 Presto 通过 Prestissimo 来使用 Velox,但是我按照那个官方文档遇到一些问题,主要是编译代码的问题,试了很多次,终于于最近几天调通了相关的代码,所以这篇文章主要会介绍如果从零开始一步一步的在 Presto 中使用 Velox。
代码下载及编译
注意,本文是以 Apple M1 Pro Monterey 系统进行介绍的,其他平台及芯片可能和这里不一样。。
依次执行以下命令来下载 Presto 的相关代码:
git remote add upstream  https://github.com/prestodb/presto.git
git fetch upstream
git checkout upstream/master
cd presto
./mvnw clean install -DskipTests -T 12
执行完上面操作之后,我们就下载了 Presto 的最新代码,并对 Presto 项目进行了编译。之后,我们执行下面命令来同步 Velox 的代码:
cd presto
➜  presto git:(master) make -C presto-native-execution submodules
git submodule sync --recursive
git submodule update --init --recursive
Submodule 'presto-native-execution/velox' (https://github.com/facebookincubator/velox.git) registered for path 'velox'
Cloning into '/Users/iteblog/data/code/apache/presto/presto-native-execution/velox'...
Submodule path 'velox': checked out '2c7eea574d3d7c3d3307528b08c67a77f4636f99'
Submodule 'third_party/googletest' (https://github.com/google/googletest.git) registered for path 'velox/third_party/googletest'
Submodule 'third_party/xsimd' (https://github.com/xtensor-stack/xsimd.git) registered for path 'velox/third_party/xsimd'
Cloning into '/Users/iteblog/data/code/apache/presto/presto-native-execution/velox/third_party/googletest'...
Cloning into '/Users/iteblog/data/code/apache/presto/presto-native-execution/velox/third_party/xsimd'...
Submodule path 'velox/third_party/googletest': checked out 'e2239ee6043f73722e7aa812a459f54a28552929'
Submodule path 'velox/third_party/xsimd': checked out '894493b3f77aa060c31d0bcb736a6ac76614bfec'
同步好 velox 代码后,我们初始化一下相关依赖环境:
cd presto-native-execution

sudo chown -R $(whoami) /usr/local/bin /usr/local/lib /usr/local/sbin; sudo chown -R $(whoami) /usr/local/bin /usr/local/lib /usr/local/bin; sudo chown -R $(whoami) /usr/local/bin /usr/local/lib /usr/local/lib; chmod u+w /usr/local/bin /usr/local/lib /usr/local/sbin; chmod u+w /usr/local/bin /usr/local/lib /usr/local/bin; chmod u+w /usr/local/bin /usr/local/lib /usr/local/lib; ./scripts/setup-macos.sh
注意,因为我是在 mac 平台上操作的,所以执行的是 setup-macos.sh 脚本,如果你是 ubuntu 或者 centos,请分别执行 setup-ubuntu.sh 或者 setup-centos.sh。
上面命令执行完之后,会在我们的电脑上面安装好 Prestissimo 和 Velox 的相关依赖,比如 fizz、thrift、antlr 以及 glog 等。接着我们来编译一下 Velox:
cd velox
make debug
编译 velox 并没有遇到什么问题,编译完会在 velox 目录下面产生 _build/debug (名字可以到 /presto/presto-native-execution/velox/Makefile 里面的 BUILD_BASE_DIR 和 BUILD_DIR 变量进行修改)文件夹。
接下来我们编译一下 Prestissimo,同样也是使用 make debug:
cd presto-native-execution
make debug
在我的电脑下,遇到了以下的异常:
[484/519] Building CXX object presto_cpp/main/thrift/CMakeFiles/presto_thrift-cpp2-obj.dir/presto_cpp/main/thrift/gen-cpp2/presto_thrift_constants.cpp.o
[485/519] Building CXX object presto_cpp/main/CMakeFiles/presto_server_lib.dir/PrestoServer.cpp.o
[486/519] Building CXX object presto_cpp/main/CMakeFiles/presto_server.dir/PrestoMain.cpp.o
[487/519] Building CXX object presto_cpp/main/thrift/CMakeFiles/presto_thrift-cpp2-obj.dir/presto_cpp/main/thrift/gen-cpp2/presto_thrift_data.cpp.o
FAILED: presto_cpp/main/thrift/CMakeFiles/presto_thrift-cpp2-obj.dir/presto_cpp/main/thrift/gen-cpp2/presto_thrift_data.cpp.o
ccache /Library/Developer/CommandLineTools/usr/bin/c++  -I/Users/iteblog/data/code/apache/presto/presto-native-execution/. -I/Users/iteblog/data/code/apache/presto/presto-native-execution/velox -I/Users/iteblog/data/code/apache/presto/presto-native-execution/velox/velox/external/xxhash -I/Users/iteblog/data/code/apache/presto/presto-native-execution/_build/debug/velox -I/Users/iteblog/data/code/apache/presto/presto-native-execution/velox/third_party/googletest/googletest/include -isystem /opt/homebrew/include -isystem /usr/local/include/antlr4-runtime -isystem /opt/homebrew/opt/openssl/include -isystem /usr/local/include/proxygen -mcpu=apple-m1+crc -std=c++17 -fvisibility=hidden -fvisibility=hidden -fvisibility-inlines-hidden -Werror -Wno-nullability-completeness -Wno-deprecated-declarations -g -arch arm64 -isysroot /Library/Developer/CommandLineTools/SDKs/MacOSX12.3.sdk -std=gnu++17 -MD -MT presto_cpp/main/thrift/CMakeFiles/presto_thrift-cpp2-obj.dir/presto_cpp/main/thrift/gen-cpp2/presto_thrift_data.cpp.o -MF presto_cpp/main/thrift/CMakeFiles/presto_thrift-cpp2-obj.dir/presto_cpp/main/thrift/gen-cpp2/presto_thrift_data.cpp.o.d -o presto_cpp/main/thrift/CMakeFiles/presto_thrift-cpp2-obj.dir/presto_cpp/main/thrift/gen-cpp2/presto_thrift_data.cpp.o -c /Users/iteblog/data/code/apache/presto/presto-native-execution/_build/debug/presto_cpp/main/thrift/presto_cpp/main/thrift/gen-cpp2/presto_thrift_data.cpp
In file included from /Users/iteblog/data/code/apache/presto/presto-native-execution/_build/debug/presto_cpp/main/thrift/presto_cpp/main/thrift/gen-cpp2/presto_thrift_data.cpp:8:
/Users/iteblog/data/code/apache/presto/presto-native-execution/_build/debug/presto_cpp/main/thrift/presto_cpp/main/thrift/gen-cpp2/../gen-cpp2/presto_thrift_data.h:9:10: fatal error: 'thrift/lib/cpp2/gen/module_data_h.h' file not found
#include <thrift/lib/cpp2/gen/module_data_h.h>
         ^~~~~~~~~~~~~~~~~~~~~~~~~~~~~~~~~~~~~
1 error generated.
[488/519] Building CXX object velox/velox/external/duckdb/CMakeFiles/duckdb.dir/duckdb-2.cpp.o
[489/519] Building CXX object presto_cpp/main/CMakeFiles/presto_server_lib.dir/TaskResource.cpp.o
[490/519] Building CXX object presto_cpp/main/thrift/CMakeFiles/presto_thrift-cpp2-obj.dir/presto_cpp/main/thrift/gen-cpp2/presto_thrift_types.cpp.o
FAILED: presto_cpp/main/thrift/CMakeFiles/presto_thrift-cpp2-obj.dir/presto_cpp/main/thrift/gen-cpp2/presto_thrift_types.cpp.o
ccache /Library/Developer/CommandLineTools/usr/bin/c++  -I/Users/iteblog/data/code/apache/presto/presto-native-execution/. -I/Users/iteblog/data/code/apache/presto/presto-native-execution/velox -I/Users/iteblog/data/code/apache/presto/presto-native-execution/velox/velox/external/xxhash -I/Users/iteblog/data/code/apache/presto/presto-native-execution/_build/debug/velox -I/Users/iteblog/data/code/apache/presto/presto-native-execution/velox/third_party/googletest/googletest/include -isystem /opt/homebrew/include -isystem /usr/local/include/antlr4-runtime -isystem /opt/homebrew/opt/openssl/include -isystem /usr/local/include/proxygen -mcpu=apple-m1+crc -std=c++17 -fvisibility=hidden -fvisibility=hidden -fvisibility-inlines-hidden -Werror -Wno-nullability-completeness -Wno-deprecated-declarations -g -arch arm64 -isysroot /Library/Developer/CommandLineTools/SDKs/MacOSX12.3.sdk -std=gnu++17 -MD -MT presto_cpp/main/thrift/CMakeFiles/presto_thrift-cpp2-obj.dir/presto_cpp/main/thrift/gen-cpp2/presto_thrift_types.cpp.o -MF presto_cpp/main/thrift/CMakeFiles/presto_thrift-cpp2-obj.dir/presto_cpp/main/thrift/gen-cpp2/presto_thrift_types.cpp.o.d -o presto_cpp/main/thrift/CMakeFiles/presto_thrift-cpp2-obj.dir/presto_cpp/main/thrift/gen-cpp2/presto_thrift_types.cpp.o -c /Users/iteblog/data/code/apache/presto/presto-native-execution/_build/debug/presto_cpp/main/thrift/presto_cpp/main/thrift/gen-cpp2/presto_thrift_types.cpp
In file included from /Users/iteblog/data/code/apache/presto/presto-native-execution/_build/debug/presto_cpp/main/thrift/presto_cpp/main/thrift/gen-cpp2/presto_thrift_types.cpp:7:
/Users/iteblog/data/code/apache/presto/presto-native-execution/_build/debug/presto_cpp/main/thrift/presto_cpp/main/thrift/gen-cpp2/../gen-cpp2/presto_thrift_types.h:9:10: fatal error: 'thrift/lib/cpp2/gen/module_types_h.h' file not found
#include <thrift/lib/cpp2/gen/module_types_h.h>
         ^~~~~~~~~~~~~~~~~~~~~~~~~~~~~~~~~~~~~~
1 error generated.

ninja: build stopped: subcommand failed.
make[1]: *** [build] Error 1
make: *** [debug] Error 2
看报错信息是 thrift 相关类找不到,但是我们执行 scripts/setup-macos.sh 命令的时候其实已经安装好了 fbthrift,并且我们通过 presto/presto-native-execution/fbthrift/_build/install_manifest.txt 文件知道 thrift 其实已经安装到 /usr/local/include/thrift/ 目录下了。我们到 /usr/local/include/thrift/ 下看了确实有:
➜  velox git:(2c7eea57) ll /usr/local/include/thrift/
total 24
-rw-r--r--  1 iteblog  wheel   8.3K  9 22 09:23 ThriftLibrary.cmake
drwxr-xr-x  6 iteblog  wheel   192B  6 15 17:58 lib
那唯一的原因就是 /usr/local/include 路径并没有加载到 make 的编译依赖路径里面去。我们到 presto/presto-native-execution/CMakeLists.txt 文件可以看到很多通过 include_directories 来加载路径的,那我们应该可以在这个文件里面加上以下代码,把 /usr/local/include 路径加到编译的依赖路径里面去:
include_directories(SYSTEM /usr/local/include)
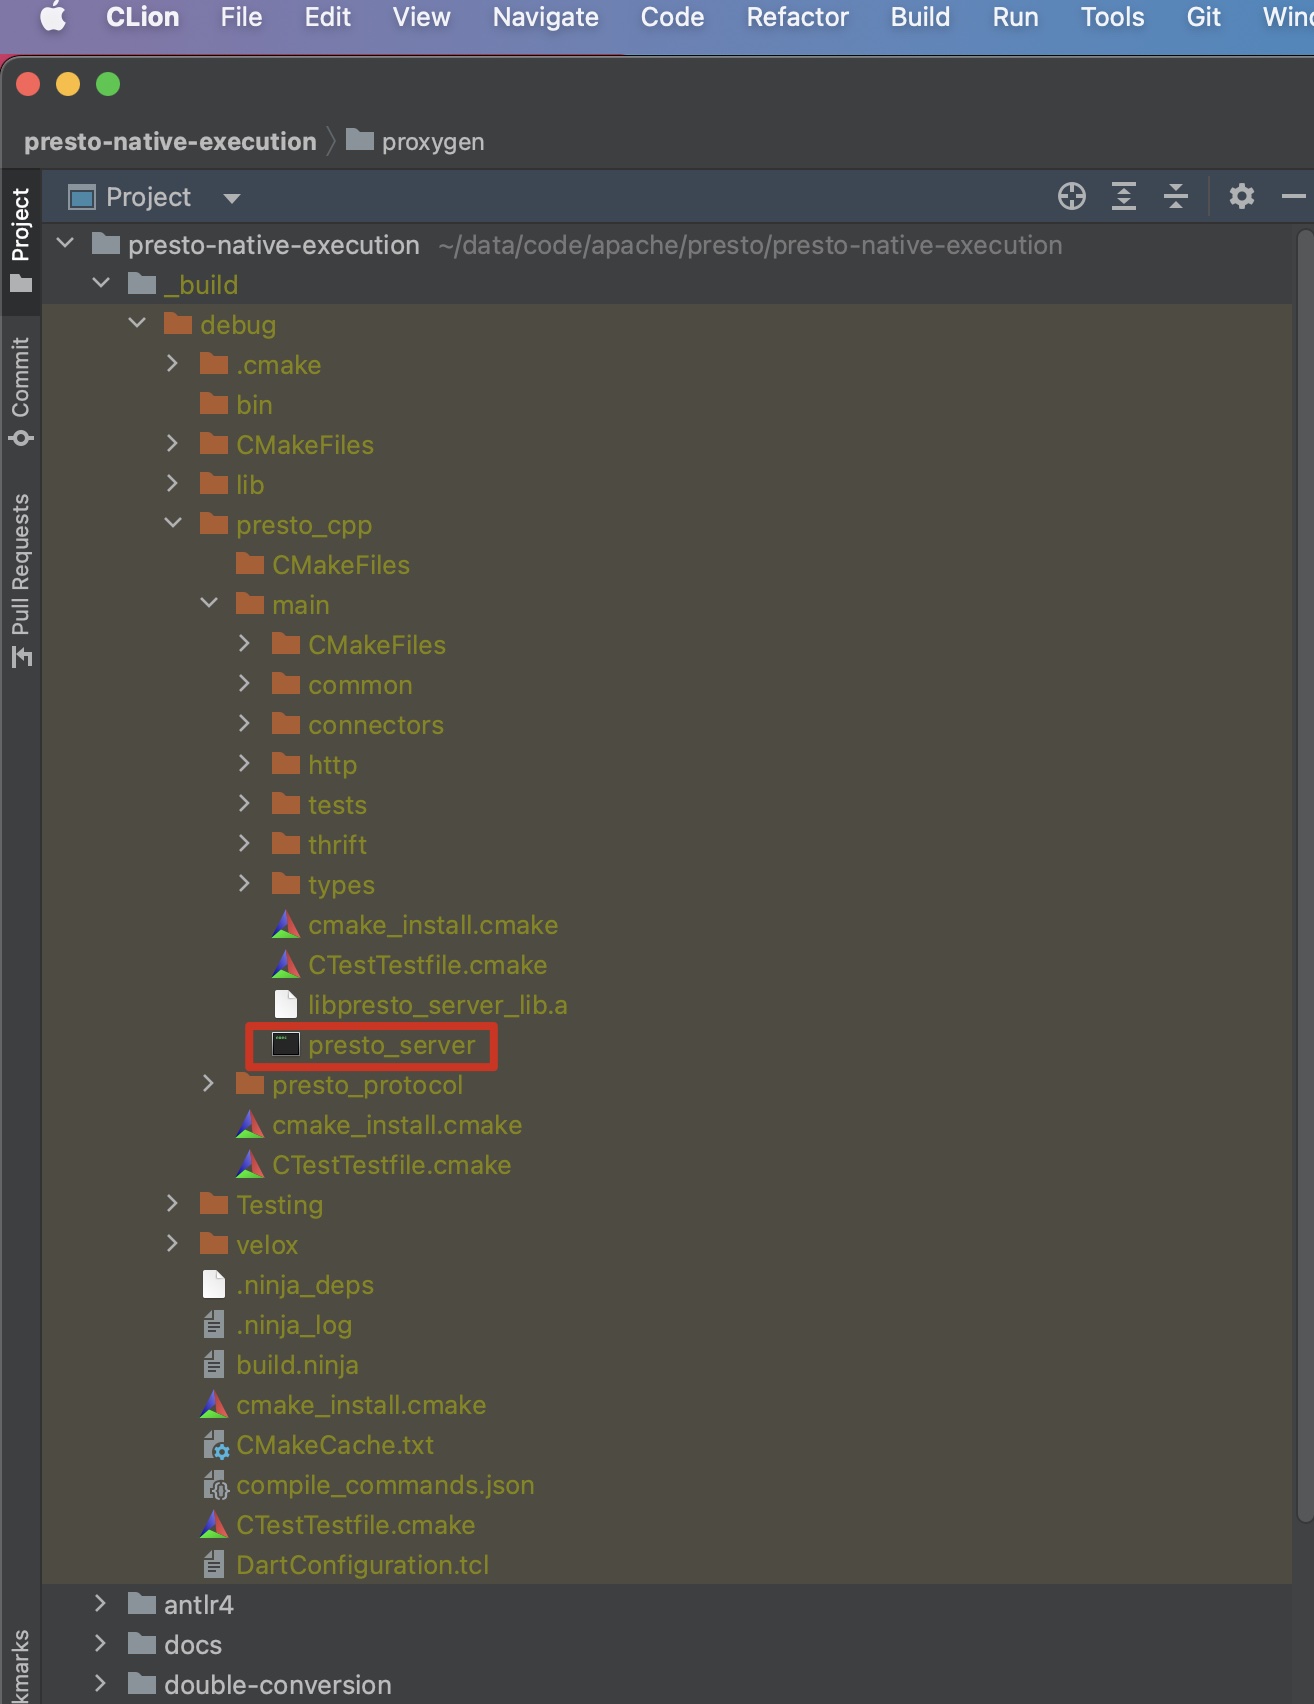
经过上面修改之后,我们再次执行 make debug 就可以正常编译了。这个时候会在 presto-native-execution 路径下面产生 _build/debug 文件夹,同时可以产生了 presto/presto-native-execution/_build/debug/presto_cpp/main/presto_server 文件,说明我们编译成功了。
到这里,相关组件已经编译完成了。
启动 Java 版和 C++ 版的 PrestoServer
要启动 C++ 版的 PrestoServer 有两种方法,一种是在启动 Java 版的 PrestoServer 时自动把 C++ 版的 PrestoServer 启动起来;另外一种就是我们自己来启动了。下面来分别介绍这两种方法。
手动启动 C++ 版的 PrestoServer
手动启动 C++ 版的 PrestoServer 也有两种,一种是通过 IDE,比如 CLion;另外一种就是直接通过命令行来启动 C++ 版的 PrestoServer。这里主要来介绍通过 CLion 来启动。
我们使用 CLion 打开 presto-native-execution 项目,然后依次选择 CLion->Preferences->Build, Execution, Deployment->CMake 菜单,并进行如下设置:
- CMake options:-DTREAT_WARNINGS_AS_ERRORS=1 -DENABLE_ALL_WARNINGS=1 -DCMAKE_PREFIX_PATH="/usr/local" -DPRESTO_ENABLE_PARQUET="OFF" -GNinja -DCMAKE_CXX_COMPILER_LAUNCHER=ccache -DVELOX_BUILD_TESTING=ON -DCMAKE_BUILD_TYPE=Debug
- Build directory:_build/debug
相关界面如下所示,设置完之后,点击保存。

如果想及时了解Spark、Hadoop或者HBase相关的文章,欢迎关注微信公众号:过往记忆大数据
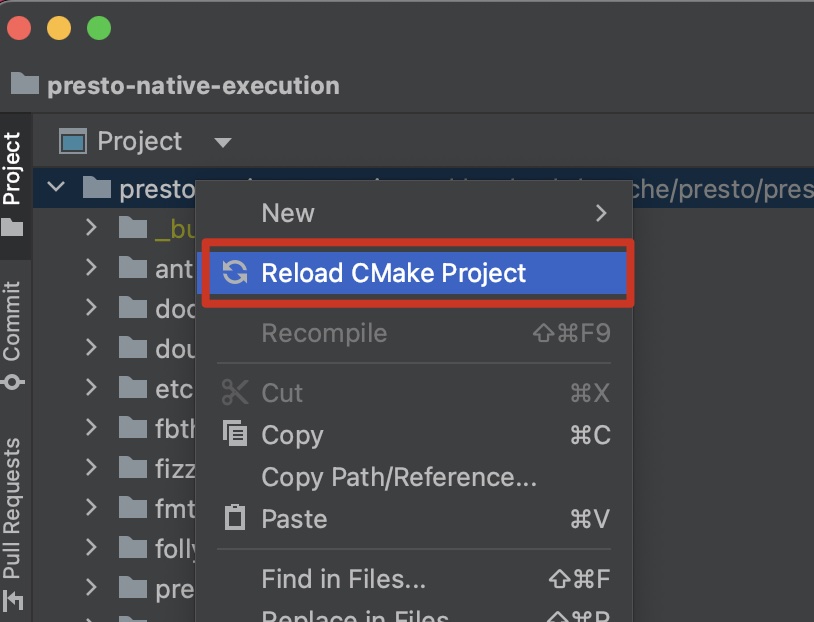
然后到 Project 里面选择 presto-native-execution ,再右键,弹出的菜单里面选择 Reload CMake Project,如下:
如果想及时了解Spark、Hadoop或者HBase相关的文章,欢迎关注微信公众号:过往记忆大数据
执行完 Reload CMake Project 之后,CLion 将出现以下的界面:

如果想及时了解Spark、Hadoop或者HBase相关的文章,欢迎关注微信公众号:过往记忆大数据
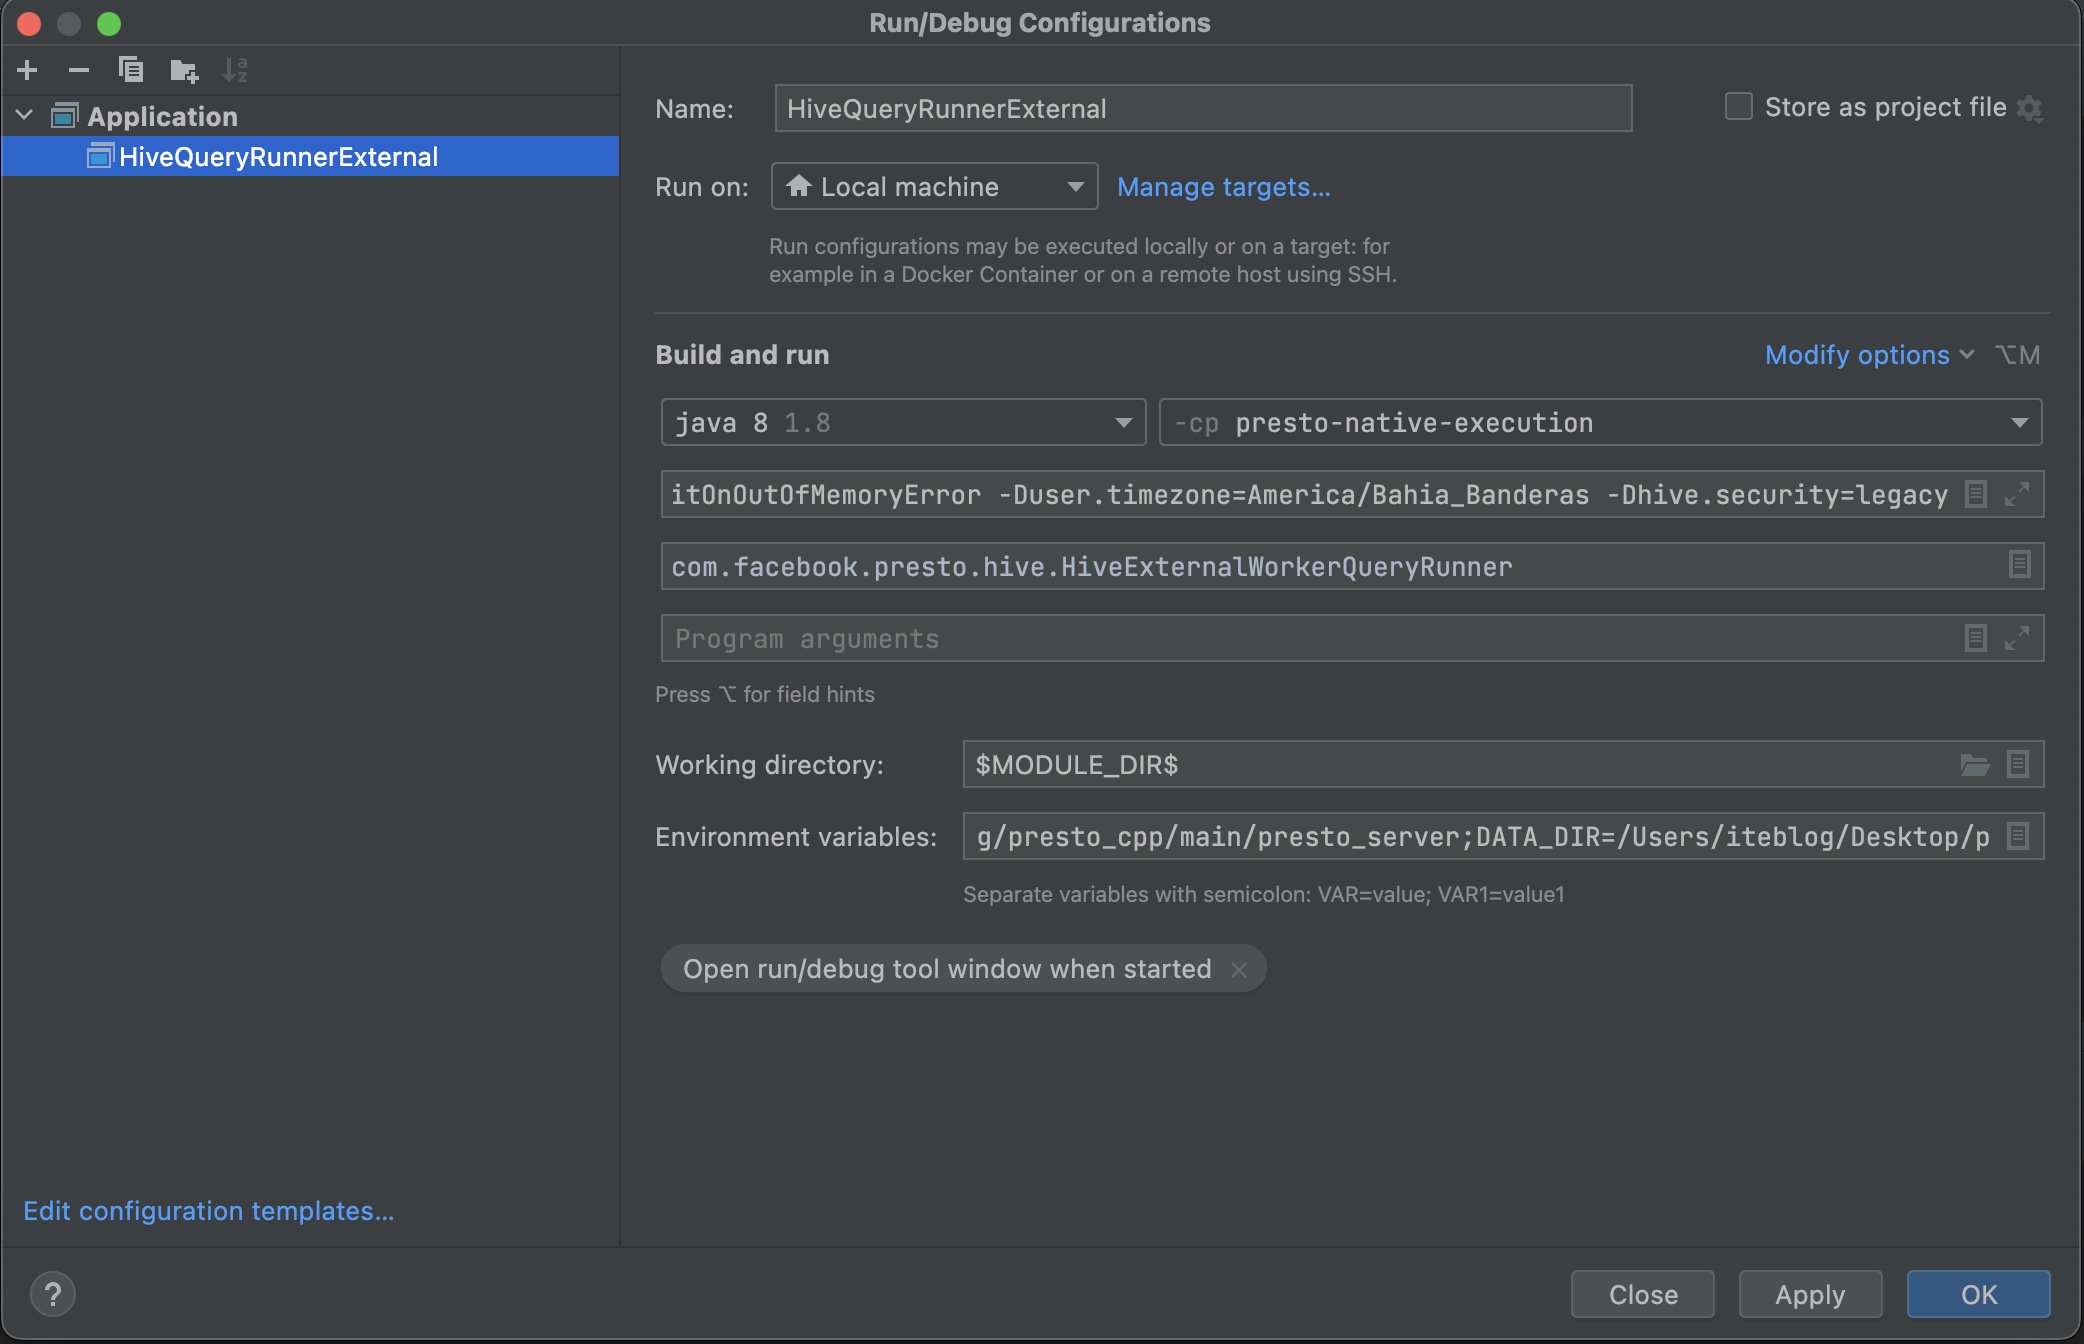
然后我们到 IntelliJ IDEA 里面创建一个名为 HiveQueryRunnerExternal 的 Application Run/Debug Configuration,具体配置如下:
- Main class: com.facebook.presto.hive.HiveExternalWorkerQueryRunner
- VM options: -ea -Xmx5G -XX:+ExitOnOutOfMemoryError -Duser.timezone=America/Bahia_Banderas -Dhive.security=legacy
- Working directory: $MODULE_DIR$
- Environment variables: PRESTO_SERVER=/Users/
/git/presto/presto-native-execution/cmake-build-debug/presto_cpp/main/presto_server;DATA_DIR=/Users/ /Desktop/data;WORKER_COUNT=0 - Use classpath of module: choose presto-native-execution module.
具体如下:
如果想及时了解Spark、Hadoop或者HBase相关的文章,欢迎关注微信公众号:过往记忆大数据
然后可以点击 Debug 或者 Run 按钮,这时候就执行了 com.facebook.presto.hive.HiveExternalWorkerQueryRunner,如果执行成功,会在 Idea 的 Console 里面输出下面日志:

如果想及时了解Spark、Hadoop或者HBase相关的文章,欢迎关注微信公众号:过往记忆大数据
这个时候说明 HiveExternalWorkerQueryRunner 启动成功了。这时候我们可以到浏览器里面打开 http://localhost:8080/ui/,但是里面的 ACTIVE WORKERS 为 0,因为我们在前面设置了 WORKER_COUNT=0。
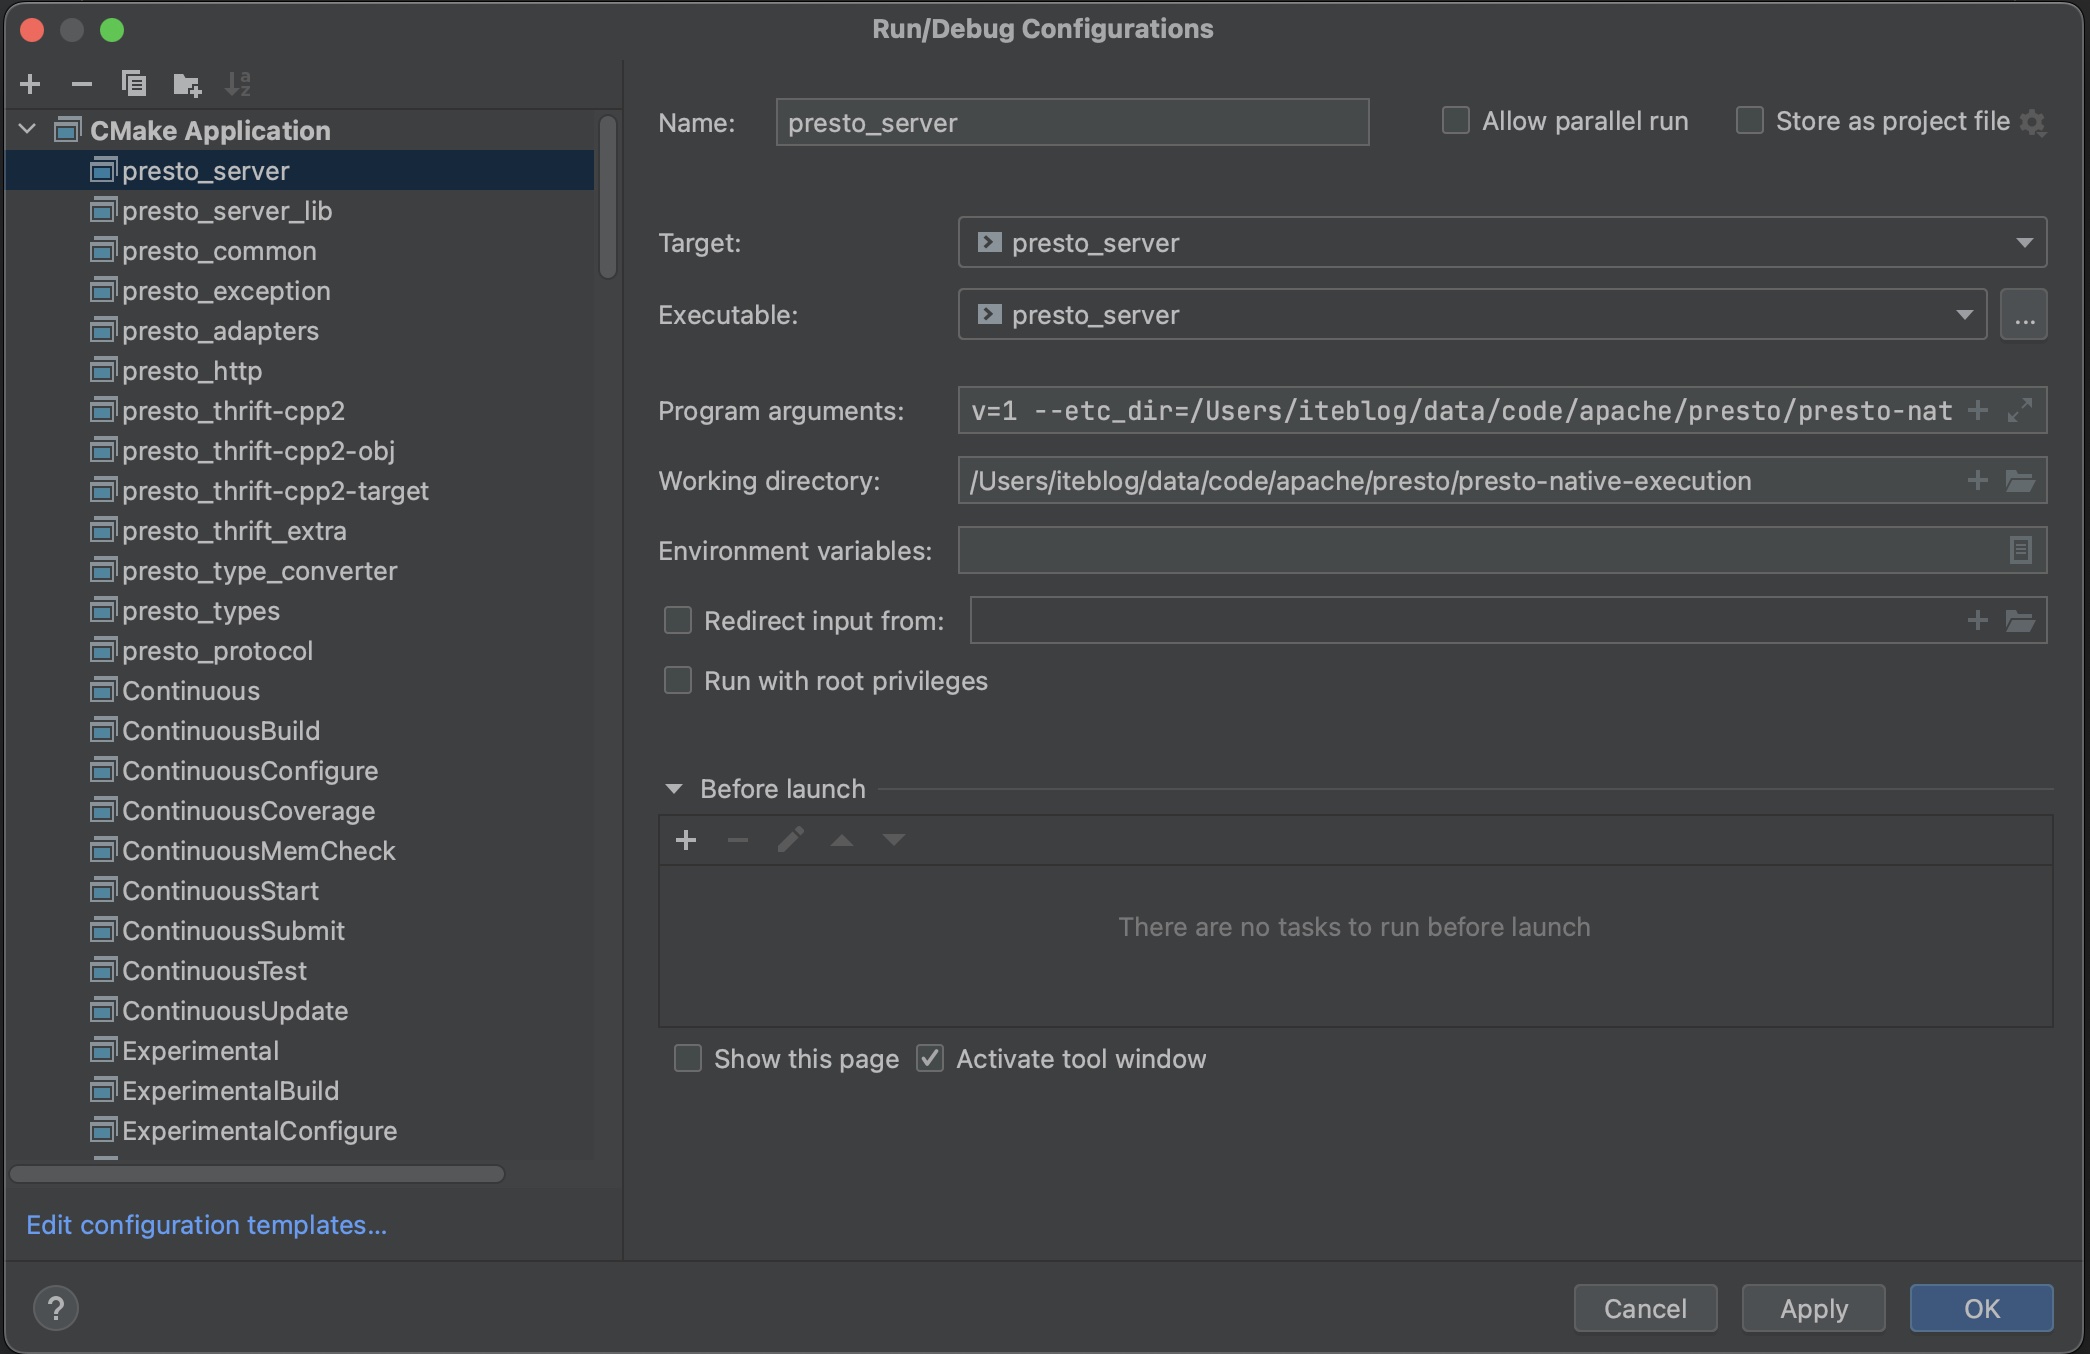
紧接着,我们到 CLion 里面设置一下 presto_server 模块的配置:
- Program arguments: --logtostderr=1 --v=1 --etc_dir=/Users/
/git/presto/presto-native-execution/etc - Working directory: /Users/
/git/presto/presto-native-execution
如下:
如果想及时了解Spark、Hadoop或者HBase相关的文章,欢迎关注微信公众号:过往记忆大数据
然后保存,并且到 presto/presto-native-execution/etc/config.properties 里面设置一下 discovery.uri 属性,这个属性的值需要到我们前面启动 HiveExternalWorkerQueryRunner 输出日志里面找(比如 Discovery URL http://127.0.0.1:55190),如下:
discovery.uri=http://127.0.0.1:55190
presto.version=testversion
http-server.http.port=7777
保存。然后在 CLion 编辑器上点击 Run 按钮,这时候其实就是启动了 C++ 版本的 presto_server。当我们看到输出的日志里面有 Announcement succeeded: 202,说明启动 presto_server 成功了,这时候 http://localhost:8080/ui/ 页面的 ACTIVE WORKERS 属性的值就变成1了;如果需要启动多个 presto_server,直接需要修改 presto/presto-native-execution/etc/config.properties 里面的 http-server.http.port 配置为不同的值即可。
/Users/iteblog/data/code/apache/presto/presto-native-execution/_build/debug/presto_cpp/main/presto_server --logtostderr=1 --v=1 --etc_dir=/Users/iteblog/data/code/apache/presto/presto-native-execution/etc
当终端输出日志里面有 Announcement succeeded: 202,也说明启动成功。
到这里, Java 版和 C++ 版的 PrestoServer 已经启动成功了,也就意味着 Presto 集群启动完成。
启动 Java 版的 PrestoServer 时一起启动 C++ 版的 PrestoServer
如果要用这种方式,直接到 IntelliJ IDEA 进行设置即可。我们到 IntelliJ IDEA 创建一个名为 HiveQueryRunnerExternal 的 Application Run/Debug Configuration,具体配置如下:
- Main class: com.facebook.presto.hive.HiveExternalWorkerQueryRunner
- VM options: -ea -Xmx5G -XX:+ExitOnOutOfMemoryError -Duser.timezone=America/Bahia_Banderas -Dhive.security=legacy
- Working directory: $MODULE_DIR$
- Environment variables: PRESTO_SERVER=/Users/
/git/presto/presto-native-execution/cmake-build-debug/presto_cpp/main/presto_server;DATA_DIR=/Users/ /Desktop/data;WORKER_COUNT=2 - Use classpath of module: choose presto-native-execution module.
注意,这里和手动启动 C++ 版的 PrestoServer 唯一不一样的地方是我们设置了 WORKER_COUNT 为一个非0的数,从字面意思就可以清楚看到,这个其实就是要启动多少个 C++ 版的 Worker 个数。如果看 HiveExternalWorkerQueryRunner 代码实现的话,设置了 WORKER_COUNT 为一个大于 0 的数之后,HiveExternalWorkerQueryRunner 里面会设置好相关的配置,最后其实也是调用了 $PRESTO_SERVER --logtostderr=1 的命令,相当于手动启动了 C++ 版的 PrestoServer。C++ 版的 PrestoServer 日志是存在临时目录下的,比如下面路径:
➜  presto-native-execution git:(master) ✗ ll /var/folders/td/0jy59bq152769sd4zqs53vgc0000gn/T/HiveExternalWorkerQueryRunner6974566121998638608/
total 80
drwxr-xr-x  4 iteblog  staff   128B  9 22 11:00 catalog
-rw-r--r--  1 iteblog  staff   129B  9 22 11:00 config.properties
-rw-r--r--  1 iteblog  staff   115B  9 22 11:00 node.properties
-rw-r--r--  1 iteblog  staff     0B  9 22 11:00 worker.2.err
-rw-r--r--  1 iteblog  staff    32K  9 22 11:02 worker.2.out
其中的 worker.2.err 和 worker.2.out 就是相关的日志。
到这里我们已经介绍了两种启动 Java 版和 C++ 版 PrestoServer 的方法。
执行 SQL
现在我们可以执行 SQL 了,我们到 Presto 代码路径下,执行以下命令,即可进入到 presto-cli 里面:
presto-cli/target/presto-cli-*-executable.jar --catalog hive --schema tpch
下面是一些执行 SQL 的例子:
presto:tpch> show schemas;
        Schema
----------------------
 __temporary_tables__
 information_schema
 tpcds
 tpcds_bucketed
 tpch
 tpch_bucketed
(6 rows)

Query 20220922_021558_00004_qup3p, FINISHED, 2 nodes
Splits: 3 total, 3 done (100.00%)
0:01 [6 rows, 104B] [9 rows/s, 169B/s]

presto:tpcds> use tpch;
USE
presto:tpch> show tables;
         Table
-----------------------
 customer
 customer_bucketed
 empty_table
 lineitem
 lineitem_bucketed
 nation
 nation_partitioned
 nation_partitioned_ds
 orders
 orders_bucketed
 orders_ex
 orders_hll
 part
 partsupp
 prestobench_customer
 prestobench_nation
 prestobench_orders
 prestobench_part
 region
 supplier
(20 rows)

Query 20220922_021733_00018_qup3p, FINISHED, 2 nodes
Splits: 3 total, 3 done (100.00%)
0:01 [20 rows, 524B] [36 rows/s, 948B/s]

presto:tpch> select count(*) from customer;
 _col0
-------
  1500
(1 row)

Query 20220922_021755_00019_qup3p, FINISHED, 1 node
Splits: 3 total, 3 done (100.00%)
0:01 [0 rows, 0B] [0 rows/s, 0B/s]

presto:tpch> select count(*) from lineitem;
 _col0
-------
 60175
(1 row)

Query 20220922_021855_00020_qup3p, FINISHED, 1 node
Splits: 9 total, 9 done (100.00%)
0:01 [0 rows, 0B] [0 rows/s, 0B/s]
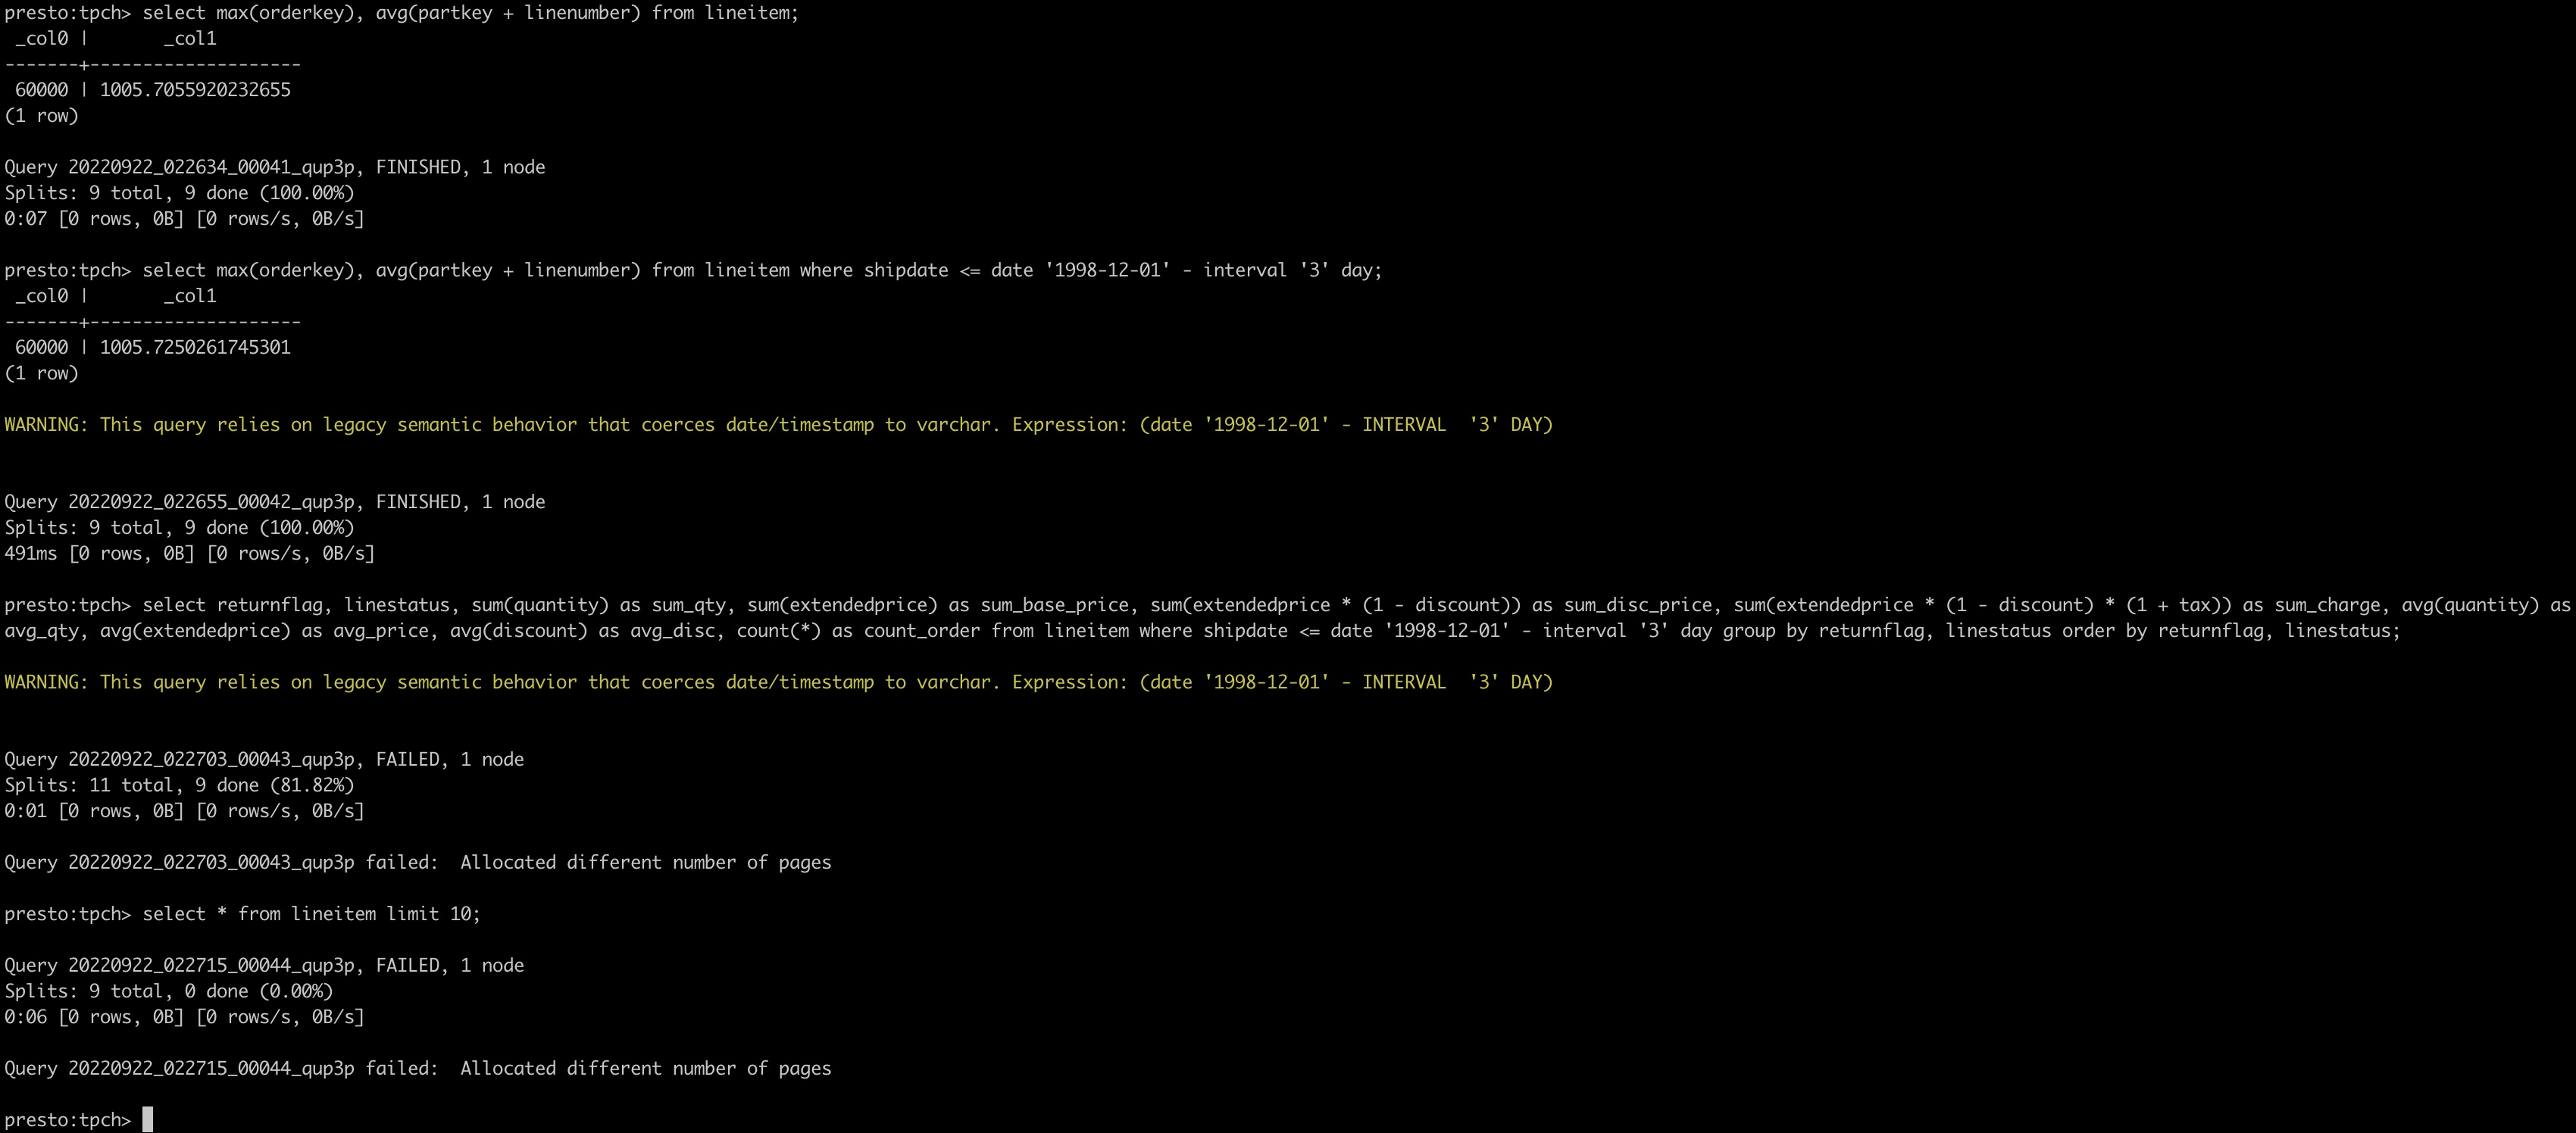
我们也可以执行一些更复杂的 SQL,如下:
如果想及时了解Spark、Hadoop或者HBase相关的文章,欢迎关注微信公众号:过往记忆大数据
上面 SQL 的解析、执行计划生成等都是在 Java 版的 PrestoServer 上进行的;SQL 执行是在 C++ 版的 PrestoServer 进行的,这些对用户来说都是透明的。在测试过程中,发现 C++ 版的 PrestoServer 很不稳定,经常出现异常而导致挂掉,如下:

如果想及时了解Spark、Hadoop或者HBase相关的文章,欢迎关注微信公众号:过往记忆大数据
不知道测试环境是不是部署的有问题。但总体而言,Facebook 的 Velox 应该还是很有前途的,Velox 不仅仅可以给 Presto 使用,还可以给其他很多计算引擎使用,抽象的还是非常厉害的。当前 Velox 以及 prestissimo 应该还处于快速发展阶段,相关模块应该还不稳定,具体可以用到生产的时间应该还有很长一段时间。
本博客文章除特别声明,全部都是原创!原创文章版权归过往记忆大数据(过往记忆)所有,未经许可不得转载。
本文链接: 【图文介绍 Presto + Velox 整合】(https://www.iteblog.com/archives/10196.html)