
Solr 介绍
Apache Solr 是基于 Apache Lucene™ 构建的流行,快速,开源的企业搜索平台。Solr 具有高可靠性,可扩展性和容错性,可提供分布式索引,复制和负载均衡查询,自动故障转移和恢复以及集中配置等特性。 Solr 为世界上许多大型互联网站点提供搜索和导航功能。
Solr 是用 Java 编写、运行在 Servlet 容器(如 Apache Tomcat 或Jetty)的一个独立的全文搜索服务器。 Solr 采用了Lucene Java 搜索库为核心的全文索引和搜索,并具有类似 REST 的 HTTP/XML 和 JSON 的 API。 Solr 强大的外部配置功能使得无需进行 Java 编码,便可对其进行调整以适应多种类型的应用程序。
本文将详细介绍如何在 Linux 平台上安装部署单机版的 Apache Solr。在写本文的时候,最新版的 solr 为 7.4.0。在安装部署之前请先安装好 Java 1.8。
Solr 下载及部署
可以使用下面的命令下载 Apache Solr:
wget http://mirrors.hust.edu.cn/apache/lucene/solr/7.4.0/solr-7.4.0.tgz
Solr 为我们提供了一个安装脚本 install_solr_service.sh(位于 Solr 压缩包里面的 bin 文件夹下),我们通过这个脚本可以一键部署安装 Apache Solr,这个脚本把 Solr 的配置文件和一些类库分开来,这样方便后期升级 Solr,下面是安装命令:
[root@iteblog.com /data/solr/solr-7.4.0/bin]$ ./install_solr_service.sh solr-7.4.0.tgz
id: solr: no such user
Creating new user: solr

Extracting solr-7.4.0.tgz to /opt

./install_solr_service.sh solr-7.4.0.tgz
Installing symlink /opt/solr -> /opt/solr-7.4.0 ...


Installing /etc/init.d/solr script ...


Installing /etc/default/solr.in.sh ...

Service solr installed.
Customize Solr startup configuration in /etc/default/solr.in.sh
*** [WARN] ***  Your Max Processes Limit is currently 7283.
 It should be set to 65000 to avoid operational disruption.
 If you no longer wish to see this warning, set SOLR_ULIMIT_CHECKS to false in your profile or solr.in.sh
Waiting up to 180 seconds to see Solr running on port 8983 [-]
Started Solr server on port 8983 (pid=22647). Happy searching!
从上面的输出可看出,Solr 是使用 solr 用户启动的(如果这个用户不存在,这个脚本会创建),而且默认的安装目录为 /opt/solr-x.x.x 下,这个脚本会给我们自动创建好链接文件 /opt/solr;配置文件默认存放在 /var/solr 文件夹下面。而且还在 /etc/default/ 目录下创建了 solr.in.sh 配置文件。脚本会默认给我们创建一个名为 solr 的服务器,我们可以使用这个服务来启动、停止以及查看 Solr 的运行状态。上面的命令相当于执行下面的操作:
./install_solr_service.sh solr-7.4.0.tgz -i /opt -d /var/solr -u solr -s solr -p 8983
关于 install_solr_service.sh 脚本的使用方法,可以使用 ./install_solr_service.sh -help 查看,这里就不介绍了。
现在我们来查看下 solr 是否运行正常:
[root@iteblog.com /opt/solr/bin]$ service solr status

Found 1 Solr nodes:

Solr process 23451 running on port 8983
INFO  - 2018-07-23 14:09:14.911; org.apache.solr.util.configuration.SSLCredentialProviderFactory; Processing SSL Credential Provider chain: env;sysprop
{
  "solr_home":"/var/solr/data",
  "version":"7.4.0 9060ac689c270b02143f375de0348b7f626adebc - jpountz - 2018-06-18 16:55:13",
  "startTime":"2018-07-23T06:08:31.179Z",
  "uptime":"0 days, 0 hours, 0 minutes, 44 seconds",
  "memory":"51.2 MB (%10.4) of 490.7 MB"}
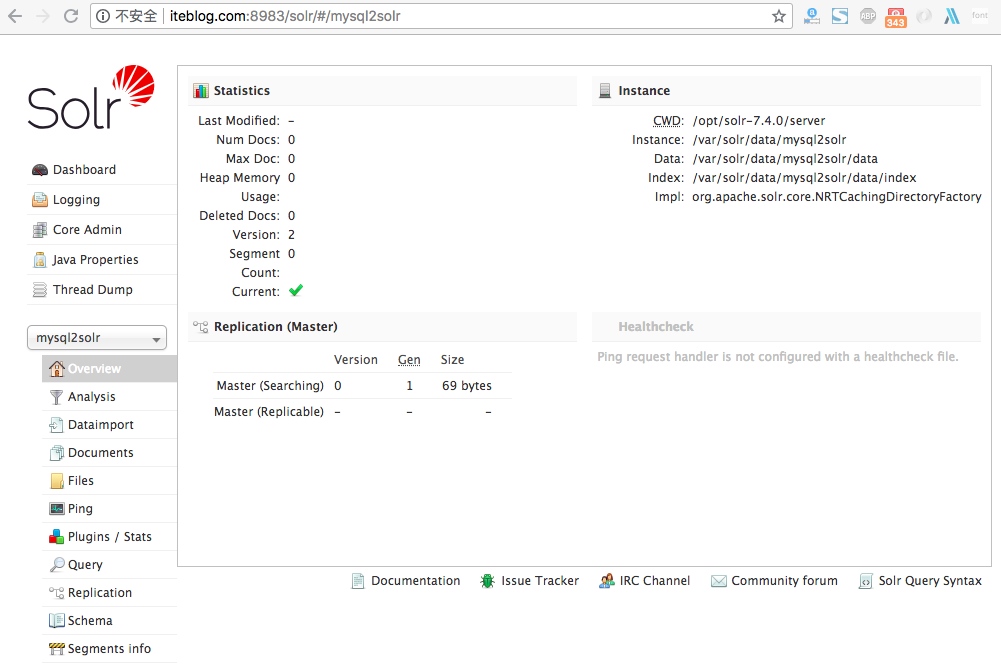
从上面的结果可以看出, Solr 运行在 8983 端口上,我们可以在浏览器查看运行的界面:

如果想及时了解Spark、Hadoop或者Hbase相关的文章,欢迎关注微信公共帐号:iteblog_hadoop
使用 Apache Solr 创建索引
现在我们已经启动了 Solr 服务,让我们来简单使用它。Solr 使用名为 core 的东西来管理索引,所以往 Solr 里面创建索引之前需要先建立一个 core,如下:
[root@iteblog.com /opt/solr]$ sudo -u solr bin/solr create_core -c iteblog
WARNING: Using _default configset with data driven schema functionality. NOT RECOMMENDED for production use.
         To turn off: bin/solr config -c iteblog -p 8983 -action set-user-property -property update.autoCreateFields -value false
INFO  - 2018-07-23 15:04:12.144; org.apache.solr.util.configuration.SSLCredentialProviderFactory; Processing SSL Credential Provider chain: env;sysprop

Created new core 'iteblog'
在上面,我们创建了一个名为 iteblog 的 core。从上面的输出日志可以看到,这个 core 使用的是默认的配置文件(_default ),这个不建议在生产环境下使用。Solr 内置提供了两种配置文件,名称分别为 _default 和 sample_techproducts_configs。如果我们需要指定自己的配置文件,可以通过参数 -d 指定,如下:
[root@iteblog.com /opt/solr]$ sudo -usolr bin/solr create -c iteblog -d /opt/solr/server/solr/configsets/iteblog/
INFO  - 2018-07-24 12:04:59.261; org.apache.solr.util.configuration.SSLCredentialProviderFactory; Processing SSL Credential Provider chain: env;sysprop

Created new core 'iteblog'
在本文的例子里面我们只需要使用 sample_techproducts_configs 的配置即可,也就是 -d /opt/solr/server/solr/configsets/sample_techproducts_configs。
core 已经创建完成,现在让我们往里面导入数据。在 Solr 的安装包里面包含了一些测试数据,比如 $SOLR_HOME/example/exampledocs/ 目录下
[root@iteblog.com solr]$ ll /opt/solr-7.4.0/example/exampledocs/
总用量 128
-rw-r--r-- 1 root root   959 12月 29 2017 books.csv
-rw-r--r-- 1 root root  1148 12月 29 2017 books.json
-rw-r--r-- 1 root root  1333 12月 29 2017 gb18030-example.xml
-rw-r--r-- 1 root root  2245 12月 29 2017 hd.xml
-rw-r--r-- 1 root root  2074 12月 29 2017 ipod_other.xml
-rw-r--r-- 1 root root  2109 12月 29 2017 ipod_video.xml
-rw-r--r-- 1 root root  2801 12月 29 2017 manufacturers.xml
-rw-r--r-- 1 root root  3090 12月 29 2017 mem.xml
-rw-r--r-- 1 root root  2156 12月 29 2017 money.xml
-rw-r--r-- 1 root root  1402 12月 29 2017 monitor2.xml
-rw-r--r-- 1 root root  1420 12月 29 2017 monitor.xml
-rw-r--r-- 1 root root   178 12月 29 2017 more_books.jsonl
-rw-r--r-- 1 root root  1976 12月 29 2017 mp500.xml
-rw-r--r-- 1 root root 27248 6月  18 22:55 post.jar
-rw-r--r-- 1 root root   235 12月 29 2017 sample.html
-rw-r--r-- 1 root root  1684 12月 29 2017 sd500.xml
-rw-r--r-- 1 root root 21052 12月 29 2017 solr-word.pdf
-rw-r--r-- 1 root root  1810 12月 29 2017 solr.xml
-rw-r--r-- 1 root root  3742 12月 29 2017 test_utf8.sh
-rw-r--r-- 1 root root  1835 12月 29 2017 utf8-example.xml
-rw-r--r-- 1 root root  2697 12月 29 2017 vidcard.xml
我们可以看到,这个文件夹里面包含了各种格式的测试文件,比如 pdf、xml、jar、csv等,没错,Solr 就是这强大,它可以索引很多类型的 数据,下面让我们来使用 Solr 对这个文件夹下面的文件进行索引:
[root@iteblog.com /opt/solr]$ bin/post -c iteblog example/exampledocs/*
/home/iteblog/java/jdk1.8.0_181/bin/java -classpath /opt/solr/dist/solr-core-7.4.0.jar -Dauto=yes -Dc=iteblog -Ddata=files org.apache.solr.util.SimplePostTool example/exampledocs/books.csv example/exampledocs/books.json example/exampledocs/gb18030-example.xml example/exampledocs/hd.xml example/exampledocs/ipod_other.xml example/exampledocs/ipod_video.xml example/exampledocs/manufacturers.xml example/exampledocs/mem.xml example/exampledocs/money.xml example/exampledocs/monitor2.xml example/exampledocs/monitor.xml example/exampledocs/more_books.jsonl example/exampledocs/mp500.xml example/exampledocs/post.jar example/exampledocs/sample.html example/exampledocs/sd500.xml example/exampledocs/solr-word.pdf example/exampledocs/solr.xml example/exampledocs/test_utf8.sh example/exampledocs/utf8-example.xml example/exampledocs/vidcard.xml
SimplePostTool version 5.0.0
Posting files to [base] url http://localhost:8983/solr/iteblog/update...
Entering auto mode. File endings considered are xml,json,jsonl,csv,pdf,doc,docx,ppt,pptx,xls,xlsx,odt,odp,ods,ott,otp,ots,rtf,htm,html,txt,log
POSTing file books.csv (text/csv) to [base]
POSTing file books.json (application/json) to [base]/json/docs
POSTing file gb18030-example.xml (application/xml) to [base]
POSTing file hd.xml (application/xml) to [base]
POSTing file ipod_other.xml (application/xml) to [base]
POSTing file ipod_video.xml (application/xml) to [base]
POSTing file manufacturers.xml (application/xml) to [base]
POSTing file mem.xml (application/xml) to [base]
POSTing file money.xml (application/xml) to [base]
POSTing file monitor2.xml (application/xml) to [base]
POSTing file monitor.xml (application/xml) to [base]
POSTing file more_books.jsonl (application/json) to [base]/json/docs
POSTing file mp500.xml (application/xml) to [base]
POSTing file post.jar (application/octet-stream) to [base]/extract
POSTing file sample.html (text/html) to [base]/extract
POSTing file sd500.xml (application/xml) to [base]
POSTing file solr-word.pdf (application/pdf) to [base]/extract
POSTing file solr.xml (application/xml) to [base]
POSTing file test_utf8.sh (application/octet-stream) to [base]/extract
POSTing file utf8-example.xml (application/xml) to [base]
POSTing file vidcard.xml (application/xml) to [base]
21 files indexed.
COMMITting Solr index changes to http://localhost:8983/solr/iteblog/update...
Time spent: 0:00:06.321
如果你看到上面的输出,说明已经索引成功了!索引的数据默认是存放在 solr.data.dir 参数默认没配置,也就是说,索引的数据默认会存放到 instanceDir 参数的 data 目录下,在我这个例子里,索引数据是存放在 /var/solr/data 目录下,具体的文件夹名称为 core 的名称:
[root@iteblog.com /var/solr/data]$ ll iteblog/
总用量 12
drwxr-xr-x 3 solr solr 4096 7月  23 15:05 conf
-rw-rw-r-- 1 solr solr   77 7月  23 15:04 core.properties
drwxrwxr-x 5 solr solr 4096 7月  23 15:04 data
上面的 conf 文件夹下面存放的是当前 core 的配置文件,这些配置文件是我们使用 sudo -u solr bin/solr create_core -c iteblog -d /opt/solr/server/solr/configsets/sample_techproducts_configs 的时候从 $SOLR_HOME/server/solr/configsets/sample_techproducts_configs/conf/ 文件夹复制过去的。
现在我们已经有了索引数据,关于如何使用 Apache Solr 检索数据请参见:《使用 Apache Solr 检索数据》
如果我们想删除 core,可以使用下面的命令实现:
[root@iteblog.com /opt/solr]$ bin/solr delete -c iteblog
INFO  - 2018-07-24 10:01:42.858; org.apache.solr.util.configuration.SSLCredentialProviderFactory; Processing SSL Credential Provider chain: env;sysprop

Deleting core 'iteblog' using command:
http://localhost:8983/solr/admin/cores?action=UNLOAD&core=iteblog&deleteIndex=true&deleteDataDir=true&deleteInstanceDir=true
如果想停止 Solr 服务,可以使用下面命令:
[root@iteblog.com /opt/solr]$ service solr stop
Sending stop command to Solr running on port 8983 ... waiting up to 180 seconds to allow Jetty process 27860 to stop gracefully.
本博客文章除特别声明,全部都是原创!
原创文章版权归过往记忆大数据(过往记忆)所有,未经许可不得转载。
本文链接: 【Apache Solr 安装部署及索引创建】(https://www.iteblog.com/archives/2393.html)